为了便于日常开发,本文将 Spring Boot 整合其他框架的过程进行了简单汇总,这包括:
整合 Spring MVC
① 在pom.xml中添加依赖:1
2
3
4
5<!-- Spring MVC -->
<dependency>
<groupId>org.springframework.boot</groupId>
<artifactId>spring-boot-starter-web</artifactId>
</dependency>
② 在application.yml中进行相关配置(部分版本):1
2
3spring:
mvc:
static-path-pattern: /static/**
整合数据库
① 在pom.xml中添加依赖:1
2
3
4
5
6
7
8
9
10
11
12<!-- MySQL -->
<dependency>
<groupId>mysql</groupId>
<artifactId>mysql-connector-java</artifactId>
<version>8.0.13</version>
</dependency>
<!-- MySQL 5.7 -->
<!--<dependency>-->
<!-- <groupId>mysql</groupId>-->
<!-- <artifactId>mysql-connector-java</artifactId>-->
<!-- <version>5.1.47</version>-->
<!--</dependency>-->
② 在application.yml中进行相关配置:1
2
3
4
5
6
7spring:
datasource:
driver-class-name: com.mysql.cj.jdbc.Driver
# driver-class-name: com.mysql.jdbc.Driver
url: jdbc:mysql://localhost:3306/DatabaseName?useUnicode=true&characterEncoding=utf-8&useSSL=false
username: root
password: 123
整合连接池
Druid
① 在pom.xml中添加依赖:1
2
3
4
5
6<!-- Druid -->
<dependency>
<groupId>com.alibaba</groupId>
<artifactId>druid-spring-boot-starter</artifactId>
<version>1.1.10</version>
</dependency>
② 在application.yml中进行相关配置:1
2
3
4
5
6
7
8
9
10
11
12
13
14
15
16
17
18
19
20
21
22
23
24
25
26
27
28
29
30
31
32
33
34
35spring:
datasource:
type: com.alibaba.druid.pool.DruidDataSource
druid:
driver-class-name: com.mysql.cj.jdbc.Driver
url: jdbc:mysql://localhost/vue_community?characterEncoding=utf8&useSSL=false&serverTimezone=GMT%2b8
username: root
password: 123
# 连接池建立时创建的初始化连接数
initial-size: 5
# 连接池中最大的活跃连接数
max-active: 20
# 连接池中最小的活跃连接数
min-idle: 5
# 配置获取连接等待超时的时间
max-wait: 60000
# 打开 PSCache,并且指定每个连接上 PSCache 的大小
pool-prepared-statements: true
max-pool-prepared-statement-per-connection-size: 20
validation-query: SELECT 1 FROM DUAL
validation-query-timeout: 30000
# 是否在获得连接后检测其可用性
test-on-borrow: false
# 是否在连接放回连接池后检测其可用性
test-on-return: false
# 是否在连接空闲一段时间后检测其可用性
test-while-idle: true
# 配置间隔多久才进行一次检测,检测需要关闭的空闲连接,单位/毫秒
time-between-eviction-runs-millis: 60000
# 配置一个连接在池中最小生存的时间,单位/毫秒
min-evictable-idle-time-millis: 300000
# 监控后台账号和密码
stat-view-servlet:
login-username: lovike
login-password: 123456
扩展——数据库密码加密
对于生产的服务器配置,一般需要隐藏明文密码,Druid 支持加密功能。
Druid 加密功能的使用需要以下步骤:
- ① 使用
druid包对数据库密码加密得到加密后的密文和公钥 - ② 在配置文件进行配置
1
2
3
4
5
6
7
8
9
10
11
12
13
14
15
16
17
18
19
20spring:
datasource:
type: com.alibaba.druid.pool.DruidDataSource
druid:
driver-class-name: com.mysql.jdbc.Driver
url: jdbc:mysql://192.168.2.14:3306/demo?characterEncoding=utf8&useSSL=false&serverTimezone=GMT%2b8
username: leeqingshui
# 1.password 修改为密文,并配置公钥
password: e4Fcw2LKX7ijcbzXVsCxxA7dSw92C0+jWwXAzszaf7HB2R3sHvFRqzIBmATtI0czjx4iMjJPayHXiw8G0uzZA==
public-key: MFwwDQYJKoZIhvcNAQEBBQADXwAwSAJBAK5jOlV2XprsR047m1EXtupUR2eeRDpXN1A9mnOcRWmKCEavapANptPqDSAJxxx3NiTw2PRAU9twseAzxVSQkCAwEAAQ==
initial-size: 5
min-idle: 5
max-active: 50
max-wait: 60000
validation-query: SELECT 1 FROM DUAL
validation-query-timeout: 30000
# 2.filter 属性追加 config
filters: stat,slf4j,config
# 3.connectionProperties 属性追加 config.decrypt=true;config.decrypt.key=${spring.datasource.druid.public-key}
connection-properties: druid.stat.logSlowSql=true;druid.stat.slowSqlMillis=5000;druid.stat.mergeSql=true;config.decrypt=true;config.decrypt.key=${spring.datasource.druid.public-key}
HikariCP
对于连接池,亦可以使用功能非常强大的HikariCP连接池,在pom.xml加入以下启动器(内嵌HikariCP连接池)即可:1
2
3
4
5<!-- jdbc:包括 HikariCP 连接池 -->
<dependency>
<groupId>org.springframework.boot</groupId>
<artifactId>spring-boot-starter-jdbc</artifactId>
</dependency>
整合热部署工具
在运行项目时,若想使修改的代码生效,一般需要重新启动项目,这无疑是非常麻烦的,Spring Boot 提供了热部署工具,使得代码修改后可以立即自动重新编译生效或手动编译生效。
首先在pom.xml中添加依赖并配置插件:1
2
3
4
5
6
7
8
9
10
11
12
13
14
15
16
17
18<!-- 热部署工具 -->
<dependencies>
<dependency>
<groupId>org.springframework.boot</groupId>
<artifactId>spring-boot-devtools</artifactId>
</dependency>
</dependencies>
<build>
<plugins>
<plugin>
<groupId>org.springframework.boot</groupId>
<artifactId>spring-boot-maven-plugin</artifactId>
<configuration>
<fork>true</fork>
</configuration>
</plugin>
</plugins>
</build>
由于热部署可以自动进行或手动进行,因此后续步骤存在差异。
自动编译
在 IDEA 配置中选择 File | Settings | Compiler 命令,然后勾选Build project automatically复选框,低版本的 IDEA 请勾选make project automatically复选框。
IDEA 设置运行程中,还需要允许自动编译,具体操作: ctrl + shift + alt + /,选择Registry,勾选勾上Compiler autoMake allow when app running
手动触发编译(推荐)
自动编译有一个不好的地方,每次在修改代码过程中都会重新编译,对系统消耗比较大,因此一般推荐手动重新编译,具体步骤为:
- 打开
edit configurations - 找到
Running Application Update Policies中的On Update action选择Update classes and resources - 点击左下角 Run 窗口的
Update xxx application按钮会触发热切换,亦可使用快捷键Ctrl + F10(mac 为Command + F10)
整合 AOP
① 在pom.xml中添加依赖:1
2
3
4
5<!-- AOP -->
<dependency>
<groupId>org.springframework.boot</groupId>
<artifactId>spring-boot-starter-aop</artifactId>
</dependency>
② 在aspect包中进行创建配置类(如日志相关)LogAspect:1
2
3
4
5
6
7
8
9
10
11
12
13
14
15
16
17
18
19
20
21
22
4j
public class LogAspect {
// @Pointcut("@annotation(cn.dk.common.annotation.Log)")
("execution(* cn.dk.controller.*.*(..))")
public void pointcut() {
}
("pointcut()")
public void getLog() {
RequestAttributes requestAttributes = RequestContextHolder.getRequestAttributes();
ServletRequestAttributes servletRequestAttributes = (ServletRequestAttributes) requestAttributes;
HttpServletRequest request = servletRequestAttributes.getRequest();
StringBuffer requestURL = request.getRequestURL();
String localAddr = request.getLocalAddr();
String method = request.getMethod();
log.debug("请求的 URL :" + requestURL.toString());
log.debug("请求的地址 :" + localAddr);
log.debug("请求的方法:" + method);
}
}
整合 Mybatis
① 在pom.xml中添加依赖:1
2
3
4
5
6<!-- Mybatis -->
<dependency>
<groupId>org.mybatis.spring.boot</groupId>
<artifactId>mybatis-spring-boot-starter</artifactId>
<version>2.1.0</version>
</dependency>
② 在application.yml中进行相关配置:1
2
3
4
5mybatis:
configuration:
map-underscore-to-camel-case: true # 映射下划线到驼峰
mapper-locations: classpath:mapper/*.xml # 扫描 mapper.xml 文件
type-aliases-package: cn.lovike.demo.entity # 别名
注意哦:Mapper接口包需要扫描,在启动类加上@MapperScan注解并加上包名即可,若Mapper接口不多时亦可直接在接口上加上@Mapper注解。
整合分页助手
在pom.xml中添加依赖即可:1
2
3
4
5
6<!-- Pagehelper 分页助手 -->
<dependency>
<groupId>com.github.pagehelper</groupId>
<artifactId>pagehelper-spring-boot-starter</artifactId>
<version>1.2.12</version>
</dependency>
整合通用 Mapper
① 在pom.xml中添加依赖:1
2
3
4
5
6<!-- 通用 Mapper -->
<dependency>
<groupId>tk.mybatis</groupId>
<artifactId>mapper-spring-boot-starter</artifactId>
<version>2.1.5</version>
</dependency>
注:加入该启动器后,其会内嵌 Mybatis 官方的启动器和jdbc启动器,所以下面的启动器可以去除:
1 | <dependency> |
而且该依赖还会自动将数据库下划线转驼峰,所以以下配置文件内容可以去掉:1
2configuration:
map-underscore-to-camel-case: true
需要注意的一点是,扫描Mapper接口包的注解(@MapperScan)需要换成通用Mapper的注解,它们名字一样,可不要导错哦!
1 | import org.springframework.boot.SpringApplication; |
通用 Mapper 简介
通用Mapper(直达-> Github 仓库)具有如下特点:
- 让开发者极其方便的使用 MyBatis 完成单表的增删改查。
- 仅支持单表操作,不支持通用的多表联合查询。
通用 Mapper 用法
举个栗子,对于一个常见的User类,首先我们会写一个UserMapper接口,然后在其中写抽象方法,最后写UserMapper.xml配置文件。
若使用通用Mapper,只需要写一个UserMapper接口,然后继承Mapper<T>即可,示例如下:1
2
3
4
5import com.demo.pojo.User;
import tk.mybatis.mapper.common.Mapper;
public interface UserMapper extends Mapper<User> {
}
这样该接口就会添加以下方法: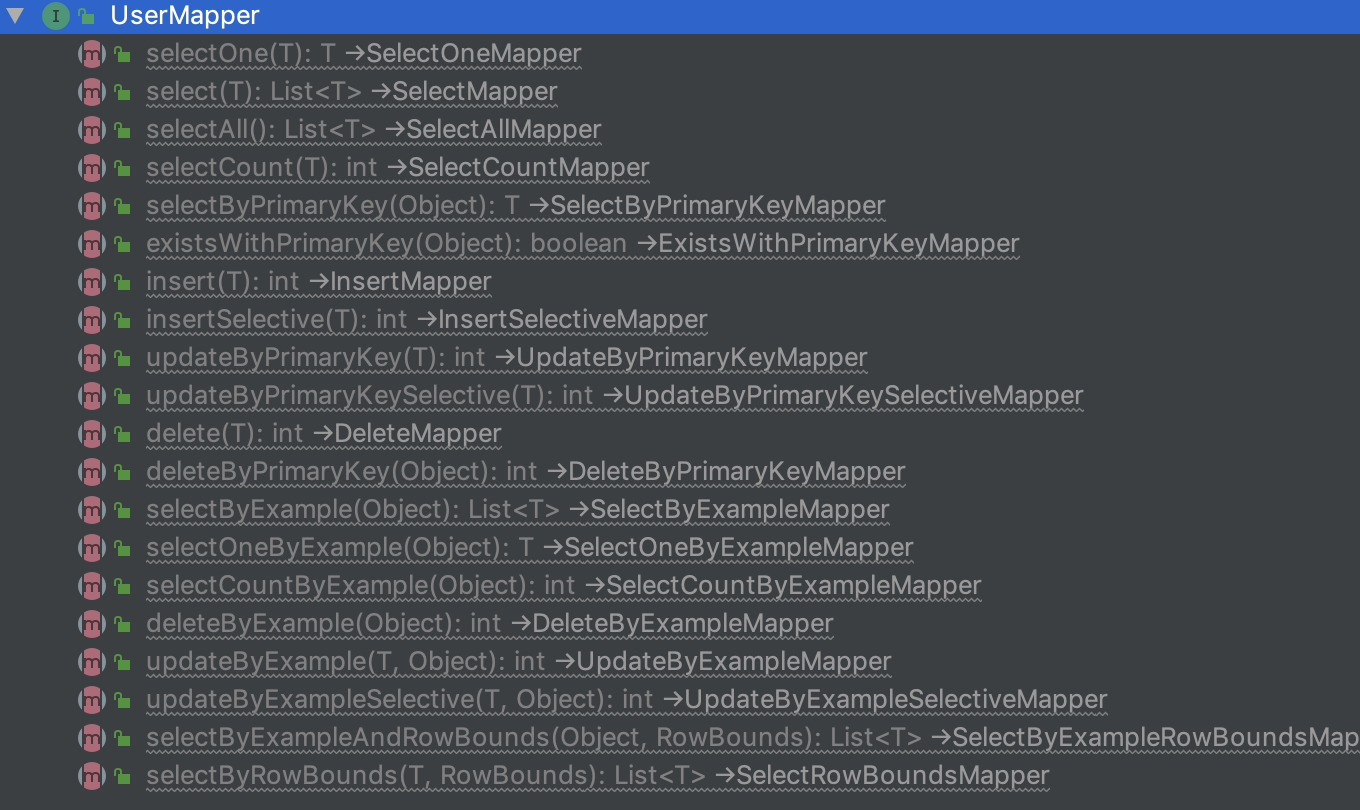
那么如何将User类和数据库表建立关联呢?你可以这么做:1
2
3
4
5
6
7
8
9
10
11
12
13
(name = "tb_user")
public class User {
(useGeneratedKeys = true)
private Long id;
private String userName;
private String password;
private String name;
private String age;
private String note;
}
@Data注解不用解释,谈下别的注解:
@Table:关联的数据表名,必须加name属性;@Id:表的主键;@KeySql:设置主键自增,将useGeneratedKeys设为true即可;@Transient:对数据表中没有的字段可以添加此注解
之后我们就可以美滋滋地按照正常的流程去使用啦。
代码生成器
为了快速开发,对于与数据表对应的 JavaBean,不会手动创建,而是通过一些代码生成器去生成。
在resources下创建generator目录,分别创建以下配置文件:
generatorConfig.propertiesgeneratorConfig.xml
1 | ########################## database info ########################## |
1 |
|
最后,在pom.xml添加插件配置:1
2
3
4
5
6
7
8
9
10
11
12
13
14
15
16
17
18
19
20
21
22
23
24
25
26
27
28<plugin>
<groupId>org.mybatis.generator</groupId>
<artifactId>mybatis-generator-maven-plugin</artifactId>
<version>1.3.5</version>
<configuration>
<configurationFile>${basedir}/src/main/resources/generator/generatorConfig.xml</configurationFile>
<overwrite>true</overwrite>
<verbose>true</verbose>
</configuration>
<dependencies>
<dependency>
<groupId>mysql</groupId>
<artifactId>mysql-connector-java</artifactId>
<version>8.0.13</version>
</dependency>
<!-- MySQL 5.7 -->
<!--<dependency>-->
<!-- <groupId>mysql</groupId>-->
<!-- <artifactId>mysql-connector-java</artifactId>-->
<!-- <version>5.1.47</version>-->
<!--</dependency>-->
<dependency>
<groupId>tk.mybatis</groupId>
<artifactId>mapper</artifactId>
<version>3.4.6</version>
</dependency>
</dependencies>
</plugin>
整合 Mybatis Plus
① 在pom.xml中添加依赖即可:1
2
3
4
5
6<!-- Mybatis Plus -->
<dependency>
<groupId>com.baomidou</groupId>
<artifactId>mybatis-plus-boot-starter</artifactId>
<version>3.1.0</version>
</dependency>
② 在application.yml中进行相关配置:1
2
3
4
5
6mybatis-plus:
global-config:
db-config:
id-type: id_worker # 主键策略
table-prefix: tb_ # 表名前缀
type-aliases-package: cn.lovike.xxx.system.entity # 别名
③ 启动类添加MapperScan("cn.lovike.xxx.system.mapper")注解
整合 JWT
① 在pom.xml中添加依赖:1
2
3
4
5
6<!-- JWT -->
<dependency>
<groupId>io.jsonwebtoken</groupId>
<artifactId>jjwt</artifactId>
<version>0.9.1</version>
</dependency>
② 在application.yml中进行相关配置:1
2
3jwt:
secretKey: lovike # 密钥
ttl: 10000 # 过期间隔
③ 编写工具类JwtUtils:1
2
3
4
5
6
7
8
9
10
11
12
13
14
15
16
17
18
19
20
21
22
23
24
25
26
27
28
29
30
31
32
33
34
35
36
37
38
(prefix = "jwt")
public class JwtUtils {
private String secretKey;
private Long ttl;
/**
* 生成 token
*
* @param claims
* @return
*/
public String generateToken(Map<String, Object> claims) {
// 设置失效时间
long now = System.currentTimeMillis();
long exp = now + ttl;
JwtBuilder jwtBuilder = Jwts.builder()
.setClaims(claims)
.setIssuedAt(new Date())
.setExpiration(new Date(exp))
.signWith(SignatureAlgorithm.HS256, secretKey);
// 构造 token 并返回
return jwtBuilder.compact();
}
/**
* 解析出 token 的相关信息
*
* @param token
* @return
*/
public Claims parseJwt(String token) {
return Jwts.parser().setSigningKey(secretKey).parseClaimsJws(token).getBody();
}
}
④ 在相关需要的地方注入使用即可。
整合 Shiro
① 在pom.xml中添加依赖:1
2
3
4
5
6<!-- Shiro -->
<dependency>
<groupId>org.apache.shiro</groupId>
<artifactId>shiro-spring-boot-starter</artifactId>
<version>1.4.0</version>
</dependency>
② 创建自定义 Realm:1
2
3
4
5
6
7
8
9
10
11
12
13
14
15
16
17
18
19
20
21
22
23
24
25
26
27
28
29
30
31
32
33
34
35
36
37
38
39
40
41
42
43
44
45
46
47
48
49
50
51
52
53
54
55
56
57
58
59
60
61
62
63
64
65
66
67
68
69
70
71
72
73
74
75
76
77
78
79
80
81
82
83
84
85
86
87
88
89
90public class CustomRealm extends AuthorizingRealm {
/**
* 用户
*/
private IUserService userService;
/**
* 角色
*/
private IRoleService roleService;
/**
* 权限
*/
private IPermissionService permissionService;
/**
* 授权时调用
*
* @param principalCollection
* @return
*/
protected AuthorizationInfo doGetAuthorizationInfo(PrincipalCollection principalCollection) {
User user = (User) principalCollection.getPrimaryPrincipal();
// 查询用户所拥的角色
List<Role> roleList = roleService.queryByUserId(user.getUserId());
SimpleAuthorizationInfo info = new SimpleAuthorizationInfo();
if (roleList != null && roleList.size() > 0) {
Set<String> roleSet = new HashSet<>();
List<Integer> roleIds = new ArrayList<>();
for (Role role : roleList) {
roleSet.add(role.getRole());
roleIds.add(role.getId());
}
// 放入角色信息
info.setRoles(roleSet);
// 放入权限信息
List<String> permissionList = permissionService.findByRoleIds(roleIds);
info.setStringPermissions(new HashSet<>(permissionList));
}
return info;
}
/**
* 身份验证时调用
*
* @param authenticationToken
* @return
* @throws AuthenticationException
*/
protected AuthenticationInfo doGetAuthenticationInfo(AuthenticationToken authenticationToken) throws AuthenticationException {
UsernamePasswordToken token = (UsernamePasswordToken) authenticationToken;
String username = token.getUsername();
User user = userService.queryByUserName(username);
/**
* 根据用户信息构建 SimpleAuthenticationInfo 对象并返回,通常使用其实现类 SimpleAuthenticationInfo
* 该类构造方法之一:
* SimpleAuthenticationInfo(Object principal, Object hashedCredentials, ByteSource credentialsSalt, String realmName)
*
* 1). principal:认证的实体信息,可以是 username,也可以是数据表对应的实体类对象
* 2). hashedCredentials:数据库中获取的加密密码
* 3). credentialsSalt:对数据库中获取的盐值加密
* 3). realmName:当前 Realm 对象的 name,调用父类的 getName() 方法即可
*/
return new SimpleAuthenticationInfo(user, user.getPassword(), ByteSource.Util.bytes(user.getSalt()), getName());
/**
* return 时会调用 AuthenticatingRealm 的 assertCredentialsMatch() 方法,
* 该方法会调用 SimpleCredentialsMatcher 的如下方法进行密码的比对
* public boolean doCredentialsMatch(AuthenticationToken token, AuthenticationInfo info) {
* // 根据前端密码及加密规则加密后的密码
* Object tokenCredentials = getCredentials(token);
* // 从数据库得到的加密密码
* Object accountCredentials = getCredentials(info);
* // 两者比对
* return equals(tokenCredentials, accountCredentials);
* }
*/
}
}
③ 创建 Shiro 配置类:1
2
3
4
5
6
7
8
9
10
11
12
13
14
15
16
17
18
19
20
21
22
23
24
25
26
27
28
29
30
31
32
33
34
35
36
37
38
39
40
41
42
43
44
45
46
47
48
49
50
51
52
53
54
55
56
57
58
59
60
61
62
63
64
65
66
67
68
69
70
71
72
73
74
75
76
77
78
79
80
81
82
83
84
public class ShiroConfig {
/**
* 凭证匹配器:用于对加密的密码进行验证
*
* @return
*/
public CredentialsMatcher credentialsMatcher() {
HashedCredentialsMatcher matcher = new HashedCredentialsMatcher();
// 设置加密算法
matcher.setHashAlgorithmName("md5");
// 设置加密次数
matcher.setHashIterations(1024);
return matcher;
}
/**
* 注入自定义 Realm
*
* @return
*/
public Realm customRealm() {
CustomRealm customRealm = new CustomRealm();
// 设置凭证匹配器
customRealm.setCredentialsMatcher(credentialsMatcher());
return customRealm;
}
/**
* 注入 SecurityManager 并设置自定义 Realm
*
* @return
*/
public SecurityManager securityManager() {
DefaultWebSecurityManager manager = new DefaultWebSecurityManager();
manager.setRealm(customRealm());
return manager;
}
/**
* 注入过滤链并设置过滤规则
*
* @return
*/
public ShiroFilterFactoryBean shirFilter() {
ShiroFilterFactoryBean shiroFilterFactoryBean = new ShiroFilterFactoryBean();
// 必须设置 SecurityManager
shiroFilterFactoryBean.setSecurityManager(securityManager());
// 若不设置默认会自动寻找 Web 工程根目录下的 /login.jsp 页面 或映射 /login
shiroFilterFactoryBean.setLoginUrl("/login");
// 登录成功后要跳转的链接
shiroFilterFactoryBean.setSuccessUrl("/index");
// 未授权页面跳转的 url
shiroFilterFactoryBean.setUnauthorizedUrl("/403");
// 页面过滤规则链
Map<String, String> filterChainDefinitionMap = new HashMap<>();
// 以下页面允许匿名访问
filterChainDefinitionMap.put("/static/**", "anon");
filterChainDefinitionMap.put("/login", "anon");
// 其他页面需认证后方可访问
filterChainDefinitionMap.put("/**", "authc");
shiroFilterFactoryBean.setFilterChainDefinitionMap(filterChainDefinitionMap);
return shiroFilterFactoryBean;
}
public static DefaultAdvisorAutoProxyCreator getDefaultAdvisorAutoProxyCreator() {
DefaultAdvisorAutoProxyCreator creator = new DefaultAdvisorAutoProxyCreator();
/**
* setUsePrefix(false)用于解决一个奇怪的bug。在引入spring aop的情况下。
* 在@Controller注解的类的方法中加入@RequiresRole注解,会导致该方法无法映射请求,导致返回404。
* 加入这项配置能解决这个bug
*/
creator.setUsePrefix(true);
return creator;
}
}
整合 Swagger
① 在pom.xml中添加依赖:1
2
3
4
5
6
7
8
9
10
11
12
13
14
15
16
17<!-- Swagger -->
<dependency>
<groupId>io.springfox</groupId>
<artifactId>springfox-swagger2</artifactId>
<version>2.9.2</version>
</dependency>
<dependency>
<groupId>io.springfox</groupId>
<artifactId>springfox-swagger-ui</artifactId>
<version>2.9.2</version>
</dependency>
<!-- Swagger 的 UI 优化 -->
<dependency>
<groupId>com.github.xiaoymin</groupId>
<artifactId>swagger-bootstrap-ui</artifactId>
<version>1.9.3</version>
</dependency>
② 在application.yml中进行相关配置:1
2
3
4
5
6
7
8swagger:
title: 标题
description: 描述
version: 1.0.0
name: lovike
url: https://lovike.cn
email: 940124743@qq.com
enable: true # 多环境安全配置是否开启 Swagger,对于生产环境,一般需要关闭 Swagger
③ 在 config 包下创建 SwaggerConfig配置类:1
2
3
4
5
6
7
8
9
10
11
12
13
14
15
16
17
18
19
20
21
22
23
24
25
26
27
28
29
30
31
32
33
34
35
36
37
38
39
40
41
42 // lombok
// 必须存在
2 // 必须存在
(prefix = "swagger") // 配置前缀
public class SwaggerConfig {
private String title;
private String description;
private String version;
private String name;
private String url;
private String email;
private boolean enable;
public Docket customDocket() {
return new Docket(DocumentationType.SWAGGER_2)
.apiInfo(apiInfo()) // 创建该 Api 的基本信息,基本信息会展现在文档页面中
.select() // 返回一个 ApiSelectorBuilder 实例用来控制哪些接口暴露给 Swagger UI 来展现
.apis(RequestHandlerSelectors.basePackage("cn.lovike.community.sys.controller")) // 指定需要扫描的包路路径
.paths(PathSelectors.any())
.build()
.enable(enable); // 设置开关
}
private ApiInfo apiInfo() {
// Contact 包需使用 springfox 中的
Contact contact = new Contact(name, url, email);
return new ApiInfoBuilder()
.title(title)
.description(description)
.contact(contact)
.version(version)
.build();
}
}
④ 若出现资源无法加载问题,可在 config 包下创建 MvcConfig配置类解决:1
2
3
4
5
6
7
8
9
10
11
12
13
14
15
16
17
18
19
20
21
22
23
24
25
26
27
28
29
30
31
public class MvcConfig implements WebMvcConfigurer {
public void addInterceptors(InterceptorRegistry registry) {
// 拦截除放行路径外所有路径
registry.addInterceptor(tokenInterceptor)
.addPathPatterns("/**")
.excludePathPatterns(
"/swagger-resources/**", "/webjars/**", "/v2/**", "/swagger-ui.html/**"
);
}
public void addResourceHandlers(ResourceHandlerRegistry registry) {
// 解决静态资源无法加载问题
registry.addResourceHandler("/**")
.addResourceLocations("classpath:/static/");
// 解决 swagger-ui 界面 404 问题
registry.addResourceHandler("swagger-ui.html")
.addResourceLocations("classpath:/META-INF/resources/");
// 解决 swagger-doc 界面 404 问题
registry.addResourceHandler("doc.html")
.addResourceLocations("classpath:/META-INF/resources/");
// 解决 swagger 的 js 无法加载问题
registry.addResourceHandler("/webjars/**")
.addResourceLocations("classpath:/META-INF/resources/webjars/");
}
}
什么是 Swagger?
Swagger allows you to describe the structure of your APIs so that machines can read them. The ability of APIs to describe their own structure is the root of all awesomeness in Swagger. Why is it so great? Well, by reading your API’s structure, we can automatically build beautiful and interactive API documentation. We can also automatically generate client libraries for your API in many languages and explore other possibilities like automated testing. Swagger does this by asking your API to return a YAML or JSON that contains a detailed description of your entire API. This file is essentially a resource listing of your API which adheres to OpenAPI Specification. The specification asks you to include information like:
What are all the operations that your API supports?
What are your API’s parameters and what does it return?
Does your API need some authorization?
And even fun things like terms, contact information and license to use the API.
You can write a Swagger spec for your API manually, or have it generated automatically from annotations in your source code. Check swagger.io/open-source-integrations for a list of tools that let you generate Swagger from code.
翻译:Swagger 可以描述 API 的结构,以便机器可以读取他们。API 描述其自身结构的能力是 Swagger 中所有出色功能的源头。
Swagger 为什么这么好用呢?
Swagger 通过阅读 API 的结构,就可以自动构建漂亮的交互式 API 文档,不仅如此,它还可以自动以多种语言为 API 生成客户端库,并探索其他可能性,比如自动化测试。
Swagger 通过要求您的 API 返回一个完整 API 详细描述的 YAML 或 JSON 文件来实现该目的。此文件实质上是遵循 OpenAPI 规范的 API 的资源清单。该规范要求您包括以下信息::
- API 支持哪些操作?
- API 的参数是什么,返回什么?
- API 是否需要一些授权?
- 其他有趣的东西,比如条款、联系信息和使用 API 的许可证
您可以为您的 API 手动编写 Swagger 规范,也可以从源代码中的注释自动生成它。
简单来讲,Swagger 是一系列 RESTful API 的工具, 通过 Swagger 你可以获得项目的一种交互式文档,客户端 SDK 的自动生成等功能。
常用注解
@Api
@Api标识在类上,可以标记一个 Controller 类作为 Swagger 文档资源。
代码示例:1
2
3
4
5
("/sys")
(tags = "用户模块",description = "用户模块相关接口")
public class UserController {
}
@ApiModel 和 @ApiModelProperty
@ApiModel:标识在类上,用于描述实体类的作用。@ApiModelProperty():标识在字段上,用于描述 model 属性
代码示例:1
2
3
4
5
6
7
8
9
10
11
12
13
14
15
16
17
18
19
20
(value = "com.lovike.vo.req.UpdateUserReqVO",description = "更新用户参数")
public class UpdateUserReqVO {
(value = "用户id")
private String id;
(value = "账号")
private String username;
(value = "密码")
private String password;
(value = "手机号")
private String phone;
(value = "机构id")
private String deptId;
(value = "真实名称")
private String realName;
(value = "昵称")
private String nickName;
(value = "性别")
private Integer sex;
}
@ApiParam
@ApiParam标识在 Controller 接口方法中的参数上。
代码示例:1
2
3
4("/getUser")
public SysUser getUserInfo(@ApiParam(value = "用户id",required = true) @RequestParam String id){
return userService.getUserInfo(id);
}
@ApiOperation
@ApiOperation标识在 Controller 里的方法上,描述了每一个接口的具体作用。
代码示例:1
2
3
4("/getUser")
(value = "获取用户信息接口")
public SysUser getUserInfo(@ApiParam(value = "用户id",required = true) @RequestParam String id){
return userService.getUserInfo(id); }
@ApiResponse 和 ApiResponses
@ApiResponse标识在方法上,用于描述接口响应的一些信息;
@ApiResponses则组装了多个@ApiResponse。
代码示例:1
2
3
4
5
6("/getUser")
(value = "获取用户信息接口")
({ (code = 0, message = "响应成功", response = SysUser.class) })
public SysUser getUserInfo(@ApiParam(value = "用户id",required = true) @RequestParam String id){
return userService.getUserInfo(id);
}
@ApiImplicitParam 和 ApiImplicitParams
@ApiImplicitParam和ApiImplicitParams标识在方法上,用于描述单独的请求参数。1
2
3
4
5
6
7
8
9("/getUser")
(value = "获取用户信息接口")
({ (code = 200, message = "响应成功", response = SysUser.class) })
({
(name = "id", value = "用户id", dataType = "string", paramType = "query", required = true, defaultValue = "0f09e661-7e80-4e1b-b66a-2e266bb593bf")
})
public SysUser getUserInfo(@ApiParam(value = "用户id",required = true) @RequestParam String id){
return userService.getUserInfo(id);
}
整合 FastJson
在pom.xml中添加依赖即可:1
2
3
4
5<dependency>
<groupId>com.alibaba</groupId>
<artifactId>fastjson</artifactId>
<version>1.2.70</version>
</dependency>
常用类
FastJson 中提供了三个常用的类:
- JSON:FastJson 的解析器,用于 JSON 格式字符串与 JSON 对象及 JavaBean 之间的转换
- JSONObject:FastJson 提供的 JSON 对象,本质为 Map
- JSONArray:FastJson 提供 JSON 数组对象,本质为 List
JSON
序列化:Object 转 String
1 | String jsonStr = JSON.toJSONString(object); |
注:JavaBean、数组、List、Set、Map、JSONObject、JSONArray 均可通过该方式转 String
反序列化
String 转 Object
1 | // 转化为指定对象 |
String 转 List
1 | // 转化为对象集合 |
String 转 Set
1 | Set<String> set = JSON.parseObject(setStr, new TypeReference<Set<String>>() {}); |
测试代码:1
2
3
4
5
6
7
8
9
10
11
12
13
public void testSet() {
Set<String> idSet = new TreeSet<>();
idSet.add(UUID.randomUUID().toString());
idSet.add(UUID.randomUUID().toString());
idSet.add(UUID.randomUUID().toString());
String setStr = JSON.toJSONString(idSet);
Set<String> set = JSON.parseObject(setStr, new TypeReference<Set<String>>() {});
for (String s : set) {
System.out.println(s);
}
}
String 转 Map
1 | Map map = (Map)JSON.parse(jsonStr); |
测试代码:1
2
3
4
5
6
7
8
9
10
11
12
13
14
public void testMap() {
Map<String, Object> userMap = new HashMap<>();
userMap.put("name", "jack");
userMap.put("age", 18);
String mapStr = JSON.toJSONString(userMap);
Map<String, Object> map = JSON.parseObject(mapStr, new TypeReference<Map<String, Object>>() {
});
Set<Map.Entry<String, Object>> entries = map.entrySet();
for (Map.Entry<String, Object> entry : entries) {
System.out.println(entry.getKey());
System.out.println(entry.getValue());
}
}
JSONObject
下面是 JSONObject 的源码(仅列举了一些常用方法):1
2
3
4
5
6
7
8
9
10
11
12
13
14
15
16
17
18
19
20
21
22
23
24
25
26
27
28
29
30
31
32
33
34
35
36
37
38
39
40
41
42
43
44
45
46
47
48
49
50
51
52
53
54
55
56
57
58
59
60
61
62
63
64
65
66
67
68
69
70
71
72
73
74
75
76
77
78
79
80
81
82
83
84
85public class JSONObject extends JSON implements Map<String, Object>, Cloneable, Serializable, InvocationHandler {
private static final int DEFAULT_INITIAL_CAPACITY = 16;
private final Map<String, Object> map;
public JSONObject() {
this(16, false);
}
public JSONObject(Map<String, Object> map) {
if (map == null) {
throw new IllegalArgumentException("map is null.");
} else {
this.map = map;
}
}
public int size() {
return this.map.size();
}
public boolean isEmpty() {
return this.map.isEmpty();
}
public boolean containsKey(Object key) {
return this.map.containsKey(key);
}
public boolean containsValue(Object value) {
return this.map.containsValue(value);
}
public Object get(Object key) {
Object val = this.map.get(key);
if (val == null && key instanceof Number) {
val = this.map.get(key.toString());
}
return val;
}
public JSONObject getJSONObject(String key) {
Object value = this.map.get(key);
if (value instanceof JSONObject) {
return (JSONObject)value;
} else if (value instanceof Map) {
return new JSONObject((Map)value);
} else {
return value instanceof String ? JSON.parseObject((String)value) : (JSONObject)toJSON(value);
}
}
public JSONArray getJSONArray(String key) {
Object value = this.map.get(key);
if (value instanceof JSONArray) {
return (JSONArray)value;
} else if (value instanceof List) {
return new JSONArray((List)value);
} else {
return value instanceof String ? (JSONArray)JSON.parse((String)value) : (JSONArray)toJSON(value);
}
}
public Object put(String key, Object value) {
return this.map.put(key, value);
}
public Object remove(Object key) {
return this.map.remove(key);
}
public Set<String> keySet() {
return this.map.keySet();
}
public Collection<Object> values() {
return this.map.values();
}
public Set<Entry<String, Object>> entrySet() {
return this.map.entrySet();
}
...
}
JSONArray
下面是 JSONArray 的源码(仅列举了一些常用方法):1
2
3
4
5
6
7
8
9
10
11
12
13
14
15
16
17
18
19
20
21
22
23
24
25
26
27
28
29
30
31
32
33
34
35
36
37
38
39
40
41
42
43
44
45
46
47
48
49
50
51
52
53
54
55
56
57
58
59
60
61
62
63
64
65
66
67
68
69
70
71
72
73
74public class JSONArray extends JSON implements List<Object>, Cloneable, RandomAccess, Serializable {
private final List<Object> list;
public JSONArray() {
this.list = new ArrayList();
}
public int size() {
return this.list.size();
}
public boolean isEmpty() {
return this.list.isEmpty();
}
public boolean contains(Object o) {
return this.list.contains(o);
}
public Iterator<Object> iterator() {
return this.list.iterator();
}
public Object[] toArray() {
return this.list.toArray();
}
public boolean remove(Object o) {
return this.list.remove(o);
}
public boolean containsAll(Collection<?> c) {
return this.list.containsAll(c);
}
public boolean addAll(Collection<? extends Object> c) {
return this.list.addAll(c);
}
public Object set(int index, Object element) {
if (index == -1) {
this.list.add(element);
return null;
} else if (this.list.size() > index) {
return this.list.set(index, element);
} else {
for(int i = this.list.size(); i < index; ++i) {
this.list.add((Object)null);
}
this.list.add(element);
return null;
}
}
public JSONObject getJSONObject(int index) {
Object value = this.list.get(index);
if (value instanceof JSONObject) {
return (JSONObject)value;
} else {
return value instanceof Map ? new JSONObject((Map)value) : (JSONObject)toJSON(value);
}
}
public JSONArray getJSONArray(int index) {
Object value = this.list.get(index);
if (value instanceof JSONArray) {
return (JSONArray)value;
} else {
return value instanceof List ? new JSONArray((List)value) : (JSONArray)toJSON(value);
}
}
}
日期处理
FastJson 若序列化一个日期字段,默认将转换为毫秒值:1
"createTime":1594439446165
因此,FastJson 提供了@JSONField注解,可以指定日期序列化格式:1
2
3
4
5
public class JavaBean {
(format="yyyy-MM-dd HH:mm:ss")
private Date createTime;
}
测试代码:1
2
3
4
5
6public void test1(){
JavaBean javaBean = new JavaBean();
javaBean.setCreateTime(new Date());
String json = JSON.toJSONString(javaBean);
System.out.println(json);
}
测试结果:1
"createTime":"2020-07-11 12:03:19"
整合 WebSocket
① 在pom.xml中添加依赖:1
2
3
4
5<!-- WebSocket -->
<dependency>
<groupId>org.springframework.boot</groupId>
<artifactId>spring-boot-starter-websocket</artifactId>
</dependency>
② 代码使用示例:1
2
3
4
5
6
7
8
9
10
11
12
13
14
15
16
17
18
19
20
21
22
23
24
25
26
27
28
29
30
31
32
33
34
35
36
37
38
39
40
41
42
43
44
45
46
47
48
49
50
51
52
53
54
55
56
57
58
59
60
61
62
63
64
65
66
67
68
69
70
71
72
73
74
75
76
77
78
79
80
81
82
83
84
85
864j
("/ws")
public class WebsocketServerEndpoint {
/**
* 用于存放当前 Websocket 对象的 Set 集合
*/
private static CopyOnWriteArraySet<WebsocketServerEndpoint> websocketServerEndpoints = new CopyOnWriteArraySet<>();
/**
* 当前连接
*/
private Session session;
/**
* 连接成功时调用
*
* @param session
*/
public void onOpen(Session session) {
this.session = session;
// 将当前 Websocket 对象放入集合
websocketServerEndpoints.add(this);
log.info("一个客户端连接成功");
}
/**
* 收到客户端消息时调用
*
* @param message
* @param session
*/
public void onMessage(String message, Session session) {
log.info("服务器已收到客户端消息");
}
/**
* 连接关闭时调用
*
* @param session
*/
public void onClose(Session session) {
// 移除当前 Websocket 对象
websocketServerEndpoints.remove(this);
log.info("已断开一个客户端连接");
}
/**
* 错误时调用
*
* @param error
* @param session
*/
public void onError(Throwable error, Session session) {
log.info("服务器发生错误啦,错误信息:{} ", error.getStackTrace());
}
/**
* 服务器将消息主动推送到客户端
*
* @param message
* @throws IOException
*/
public void sendMessage(String message) throws IOException {
session.getBasicRemote().sendText(message);
}
/**
* 广播通知所有客户端
*/
public static void broadcast() {
if (websocketServerEndpoints != null && websocketServerEndpoints.size() > 0) {
websocketServerEndpoints.forEach((k) -> {
try {
k.sendMessage("这是一条广播消息");
} catch (IOException e) {
e.printStackTrace();
}
});
}
}
}
整合 Redis
① 在pom.xml中添加依赖:1
2
3
4
5
6
7
8
9
10<!-- Redis -->
<dependency>
<groupId>org.springframework.boot</groupId>
<artifactId>spring-boot-starter-data-redis</artifactId>
</dependency>
<!-- Lettuce 需要使用 commons-pool2 创建连接池 -->
<dependency>
<groupId>org.apache.commons</groupId>
<artifactId>commons-pool2</artifactId>
</dependency>
② 在application.yml中进行相关配置:1
2
3
4
5
6
7
8
9
10
11
12
13
14
15
16
17
18
19
20
21
22spring:
redis:
# Redis 服务器地址
host: localhost
# Redis 服务器连接端口
port: 6379
# Redis 数据库索引(默认为 0 )
database: 0
# Redis 服务器连接密码(默认为空)
password:
# 连接超时时间(毫秒)
timeout: PT10S
lettuce:
pool:
# 连接池最大连接数,默认 8,使用负值表示没有限制
max-active: 100
# 连接池最大阻塞等待时间,默认 -1,使用负值表示没有限制
max-wait: PT10S
# 连接池中的最大空闲连接,默认 8
max-idle: 30
# 连接池中的最小空闲连接,默认 0
min-idle: 1
③代码使用示例:1
2
3
4
5
6
7
8
9
10
11
12
13
14
15
16
17
18
19
20
21
22
23
24
25
26
27
28
29
30
public class Demo {
...
private static final String KEY_PREFIX = "cart:uid";
private StringRedisTemplate redisTemplate;
public void demo(Cart cart,User user){
// 登录用户
Stirng userId = user.getId().toString();
// 设置 key
String key = KEY_PREFIX + userId;
// 设置 hashKey
String hsahKey = cart.getSkuId().toString();
// 获取商品数量
Integer num = cart.getNum();
BoundHashOperations<String, Object, Object> operations = redisTemplate.boundHashOps(key);
// 判断购物车商品是否存在
if (operations.hasKey(hsahKey)) {
// 存在,修改数量
String json = operations.get(hashKey).toString();
// 反序列化
cart = JSON.parseObject(json, Cart.class);
cart.setNum(cart.getNum() + num);
}
// 序列化后写回 Redis
operations.put(hashKey,JSON.toJSONString(cart));
}
整合外部 Tomcat
由于 Spring Boot 内嵌 Tomcat,但有时需要将项目放到外部 Tomcat,这种情况需做出以下调整:
① 在pom.xml中排除内嵌的 Tomcat:1
2
3
4
5
6
7
8
9
10
11
12
13
14
15<dependency>
<groupId>org.springframework.boot</groupId>
<artifactId>spring-boot-starter-websocket</artifactId>
<exclusions>
<exclusion>
<groupId>org.springframework.boot</groupId>
<artifactId>spring-boot-starter-tomcat</artifactId>
</exclusion>
</exclusions>
</dependency>
<!-- 排除 Tomcat 后需加入 servlet 依赖 -->
<dependency>
<groupId>javax.servlet</groupId>
<artifactId>javax.servlet-api</artifactId>
</dependency>
② 在启动类进行相关配置:1
2
3
4
5
6
7
8
9
10
11
12
public class DemoApplication extends SpringBootServletInitializer {
protected SpringApplicationBuilder configure(SpringApplicationBuilder builder) {
return builder.sources(DemoApplication.class);
}
public static void main(String[] args) {
SpringApplication.run(DemoApplication.class, args);
}
}
③ 修改打包方式为 war:1
<packaging>war</packaging>
④ 最好在build设置 war 包生成后的名称,方便后续访问:1
<finalName>warName</finalName>
⑤ 将生成的 war 包放到 tomcat 的 webapps 目录即可按包名访问。
模板引擎
Spring Boot 的自动配置支持以下模板引擎:
当使用其中一个模板引擎和默认配置时,模板将自动从src/main/resources/templates下获取
整合 Thymeleaf
① 在pom.xml中添加依赖:1
2
3
4
5<!-- Thymeleaf -->
<dependency>
<groupId>org.springframework.boot</groupId>
<artifactId>spring-boot-starter-thymeleaf</artifactId>
</dependency>
② 在application.yml中进行相关配置:1
2
3
4
5
6spring:
mvc:
static-path-pattern: /static/**
thymeleaf:
encoding: UTF-8
cache: false
整合 Jasypt
① 在pom.xml中添加依赖:1
2
3
4
5
6<!-- jasypt: 对配置文件敏感数据加密 -->
<dependency>
<groupId>com.github.ulisesbocchio</groupId>
<artifactId>jasypt-spring-boot-starter</artifactId>
<version>2.1.0</version>
</dependency>
② 使用测试类生成加密数据::1
2
3
4
5
6
7
8
9
10
11
12
13
14
15
16
17
18
19
20
21
22(SpringRunner.class)
public class CommunityApplicationTests {
StringEncryptor encryptor;
public void getEncrypPass() {
BasicTextEncryptor textEncryptor = new BasicTextEncryptor();
// 1.加密所需的 salt,该值需要与 application 中的配置的 password 一样
// application.yml 的配置:jasypt.encryptor.password=ahdsfasfjasfaks
textEncryptor.setPassword("ahdsfasfjasfaks");
String url = encryptor.encrypt("jdbc:mysql://localhost/databaseName?characterEncoding=utf8&useSSL=false&serverTimezone=GMT%2b8");
String username = encryptor.encrypt("root");
String password = encryptor.encrypt("123");
System.out.println("生成的 url :" + url);
System.out.println("生成的用户名 username:" + username);
System.out.println("生成的密码:" + password);
}
}
③ 在application.yml中进行相关配置:1
2
3
4
5
6
7
8
9
10
11# 使用 jasypt 对敏感数据加密
jasypt:
encryptor:
password: ahdsfasfjasfaks
spring:
datasource:
url: ENC(请输出生成的加密数据代替)
username: ENC(请输出生成的加密数据代替)
password: ENC(请输出生成的加密数据代替)
driver-class-name: com.mysql.cj.jdbc.Driver
整合 ip2region
① 在pom.xml中添加依赖:1
2
3
4
5
6
7
8
9
10
11
12<!-- ip 寻址 -->
<dependency>
<groupId>org.lionsoul</groupId>
<artifactId>ip2region</artifactId>
<version>1.7.2</version>
</dependency>
<!-- StringUtils -->
<dependency>
<groupId>org.apache.commons</groupId>
<artifactId>commons-lang3</artifactId>
<version>3.3.2</version>
</dependency>
② 通过以下命令下载ip2region项目,完成后将data文件夹复制到 SpringBoot 项目resources(除ip2region.db外文件可以删除):1
git clone https://gitee.com/lionsoul/ip2region.git
③ 编写以下工具类:
IPUtils:获取 IPAddressUtils:根据 IP 寻址
1 | import lombok.extern.slf4j.Slf4j; |
1 | import org.lionsoul.ip2region.DataBlock; |
④ 在项目中使用:1
2
3
4
5
6...
// 设置 IP 地址
sysLog.setIp(IPUtils.getIpAddr());
// 设置访问地点
sysLog.setLocation(AddressUtils.getLocalAddress(IPUtils.getIpAddr()));
...
整合 Hibernate Validator
若项目中存在spring-boot-starter-web依赖,则不需要引用相关依赖,因为其已包含了hibernate-validator
若不存在该依赖,则需要在pom.xml中添加相关依赖:1
2
3
4
5<dependency>
<groupId>org.hibernate.validator</groupId>
<artifactId>hibernate-validator</artifactId>
<version>6.0.9.Final</version>
</dependency>
参数校验
在日常开发过程中,数据的校验十分重要,即使在前端已经对数据进行校验的情况下,后端还是要对传入的数据再进行一遍校验,避免用户绕过浏览器直接通过一些 HTTP 工具直接向后端请求一些违法数据。
若手动的进行相关配置,无疑会灰常麻烦,因此一般使用一些第三方工具来提高开发效率,而 Hibernate Validator 就是这么一个参数校验工具。
Hibernate Validator
Hibernate Validator 是 Hibernate 提供的一个开源框架,通过使用注解方式非常方便的实现服务端的数据校验。
JSR(Java Specification Requests) 是一套 JavaBean 参数校验的标准,它定义了很多常用的校验注解,我们可以直接将这些注解加在我们 JavaBean 的属性上面,这样就可以在需要校验的时候进行校验了,非常方便!
hibernate Validator 作为 Bean Validation 的参考实现,除了提供 JSR 303 规范中所有内置 constraint(约束) 的实现,除此之外还有一些附加的 constraint。
因此,在日常开发中,经常使用 Hibernate Validator 来验证 Bean 的字段,由于其基于注解,因此特别方便快捷且高效。
常用注解
下表列出了一些常见的参数校验注解:
| 注解 | 说明 |
|---|---|
@Valid |
被注释的元素是一个对象,需要检查此对象的所有字段值 |
@NotNull |
被注释的元素必须不为 null |
@NotEmpty |
被注释的字符串不为 null 也不能为空 |
@NotBlank |
被注释的字符串不为 null 且必须包含一个非空白字符 |
@AssertTrue |
被注释的元素必须为 true |
@AssertFalse |
被注释的元素必须为 false |
@Pattern(regex=,flag=) |
被注释的元素必须符合指定的正则表达式 |
@Email |
被注释的元素必须是 Email 格式 |
@Min(value) |
被注释的元素必须为数字且其值必须大于等于 value |
@Max(value) |
被注释的元素必须为数字且其值必须小于等于 value |
@DecimalMin(value) |
被注释的元素必须为数字且其值必须大于等于 value |
@DecimalMax(value) |
被注释的元素必须为数字且其值必须小于等于 value |
@Size(max=, min=) |
被注释的元素的大小必须在指定范围内 |
@Digits(integer, fraction) |
被注释的元素必须为数字,其值必须在可接受的范围内 |
@Length |
被注释的字符串长度必须在指定范围内 |
@Past |
被注释的元素必须是一个过去的日期 |
@Future |
被注释的元素必须是一个将来的日期 |
@URL(protocol=,host=, port=,regexp=, flags=) |
被注释的字符串必须是一个有效 URL |
@CreditCardNumber |
被注释的字符串必须通过 Luhn 校验算法,银行卡,信用卡等号码一般都用 Luhn 计算合法性 |
注意哦 :所有的注解,推荐使用 JSR 注解,即javax.validation.constraints,而不是org.hibernate.validator.constraints
注解的使用
关于参数检验的使用,一般包括:
- 绑定到对象上
- 绑定到请求参数上
绑定到对象
1 |
|
1 |
|
我们在Controller层需要验证的对象前加上@Valid注解即可使用配置的校验规则,若验证失败,它将抛出MethodArgumentNotValidException。
绑定到请求参数(Path Variables 或 Request Parameters)
1 |
|
注意哦:使用@Valid注解对RequestParam对应的参数进行注解校验是无效的,需要使用@Validated注解来使得验证生效,因此一定要在类上加上Validated注解。
参数校验异常的处理
若参数校验出现异常,那么会抛出ConstraintViolationException异常。
一般而言,由于是后端进行校验,说明有大坏蛋绕过浏览器通过一些 HTTP 工具直接向后端违法请求一些数据,因此可以不做异常处理,展示给他不友好的信息就好了,哈哈!
整合定时器
① 在pom.xml中添加spring-boot-starter依赖(内置了定时的方法):1
2
3
4<dependency>
<groupId>org.springframework.boot</groupId>
<artifactId>spring-boot-starter</artifactId>
</dependency>
注意哦:spring-boot-starter-web中包含该依赖了。
② 创建定时任务实现类:1
2
3
4
5
6
7
8
9
10
11
12
13
14
15
16
17
18
19
20import org.springframework.scheduling.annotation.Scheduled;
import org.springframework.stereotype.Component;
/**
* @author lovike
* @since 2020-05-10
*/
public class SchedulerTask {
(fixedRate = 500)
private void processFixedRate() {
}
(cron = "0/30 30 0 * * ?")
private void processCron() {
}
}
③ 在 SpringBoot 项目的启动类添加@EnableScheduling注解,用于启用配置的定时任务
定时器语法存在 2 种:
- 参数组合
- Cron 表达式
参数组合
对于@Scheduled的使用可以总结如下几种方式:
@Scheduled(fixedRate = 5000):上一次任务开始执行后再过 5 秒执行@Scheduled(fixedDelay = 5000):上一次任务执行完毕后再过 5 秒执行@Scheduled(initialDelay = 1000, fixedRate = 5000):第一次延迟 1 秒执行,之后按fixedRate的规则每 5 秒执行一次
Cron 表达式
Cron 一共有七位,最后一位是年,Spring Boot 定时方案中只需要设置六位即可:
- 第一位:表示秒钟,取值 0 ~ 59
- 第二位:表示分钟,取值 0 ~ 59
- 第三位:表示小时,取值 0 ~ 23
- 第四位:表示天数,取值 1 ~ 31
- 第五位:表示月份,取值 1 ~ 12
- 第六位:表示星期,取值 1 ~ 7,星期一,星期二…(注:1 表示星期天,2 表示星期一)
- 第七位:表示年份,取值 1970 ~ 2099,可留空
Cron 中,还有一些特殊的符号,含义如下:
*:星号可以理解为每的意思,如每秒、每分、 每时、每天、每周、每月、每年?:问号表示这个位置的值不确定,只能出现在日期和星期这两个位置-:减号表示一个范围, 如在小时字段中使用10~12,则表示从 10 到 12 点,即 10、11、12,:逗号表示一个列表值,如在星期字段中使用1,2,4,则表示星期一、星期二、星期四/:斜杠,如 x/y,x 是开始值,y 是步长,比如在第一位(秒),0/15 就是从 0 秒开始,每隔 15 秒执行一次
下面列举几个常用的例子:
0 0 1 * * ?:每天凌晨 1 点执行0 5 1 * * ?:每天凌晨 1 点 5 分执行
整合第三方 Jar 包
①在 src/main/resource目录下新建lib文件夹,将第三方包复制进去,并且右键add as jar
② 在pom.xml中添加依赖:1
2
3
4
5
6
7
8
9
10
11
12
13
14
15
16
17<dependency>
<groupId>com.tpaic.tpfa</groupId> # 第三方包名
<artifactId>tpfa</artifactId>
<scope>system</scope>
<version>1.0</version>
<!-- 第三方包名 -->
<systemPath>${project.basedir}/src/main/resources/lib/tpfa.jar</systemPath>
</dependency>
<plugin>
<groupId>org.springframework.boot</groupId>
<artifactId>spring-boot-maven-plugin</artifactId>
<configuration>
<!-- 插件中添加这句 -->
<includeSystemScope>true</includeSystemScope>
</configuration>
</plugin>
整合:待补充
① 在pom.xml中添加依赖:1
2
② 在application.yml中进行相关配置:1
2