序言
通过传统的 JDBC 去连接数据源存在很多问题:
- ① 每次都需要输入数据库的基本信息,可否抽离一次固定以复用?
- ② Connection 是什么?每次都需要新建,大量创建与关闭会不会比较消耗资源,可否优化?
- ③ 如何保证数据的读写正确性?即事务是如何管理控制的?
- ④ SQL 语句定义、参数设置、结果集处理存在硬编码,不同的 SQL 零散地分布在各处,能否做成动态参数定义方式,并统一管理?
- ⑤ 每次都需要手动映射获取的数据到 POJO 对象,好麻烦呀,能不能自动映射?
为了解决这些问题,ORM 框架应运而生,本文介绍的 Mybatis 就是这么一个 ORM 框架。
什么是 Mybatis?
MyBatis 是一款优秀的 Java 持久化框架,它通过 XML 描述符或注解把对象与存储过程或 SQL 语句关联起来。
MyBatis 可以使用简单的 XML 文件或注解来配置和映射数据库信息,将接口和 Java 的 POJO(Plain Old Java Objects,普通的 Java对象)映射成数据库中的记录(或反向映射),几乎避免了所有的 JDBC 代码和手动设置参数以及获取结果集的操作
为什么使用 Mybatis ?
为了解决序言中的问题,Mybatis 框架应运而生 :
- 针对问题 ①、②,可以通过数据源连接池的方式进行配置及优化
- 针对问题 ③,可以通过专门的事务控制器进行管理
- 针对问题 ④,Mybatis 可以通过动态参数的形式定义到 mapper.xml 文件中并通过该类文件进行统一管理维护
- 针对问题 ⑤,Mybatis 可自动将 SQL 执行结果映射至 POJO
特点
对 Mybatis 而言:
- 需要开发者自己编写 SQL
- 可以配置动态 SQL
- 支持存储过程
- 可以优化 SQL(代码复用),这取决于你的映射规则
- 几乎能做到 JDBC 所能做到的所有事情
- 具有自动映射功能,无需再写任何的映射规则,提高了开发效率和灵活性
- 具有缓存功能
- 具有延迟加载功能
下面为 Mybatis 的 ORM 映射模型:
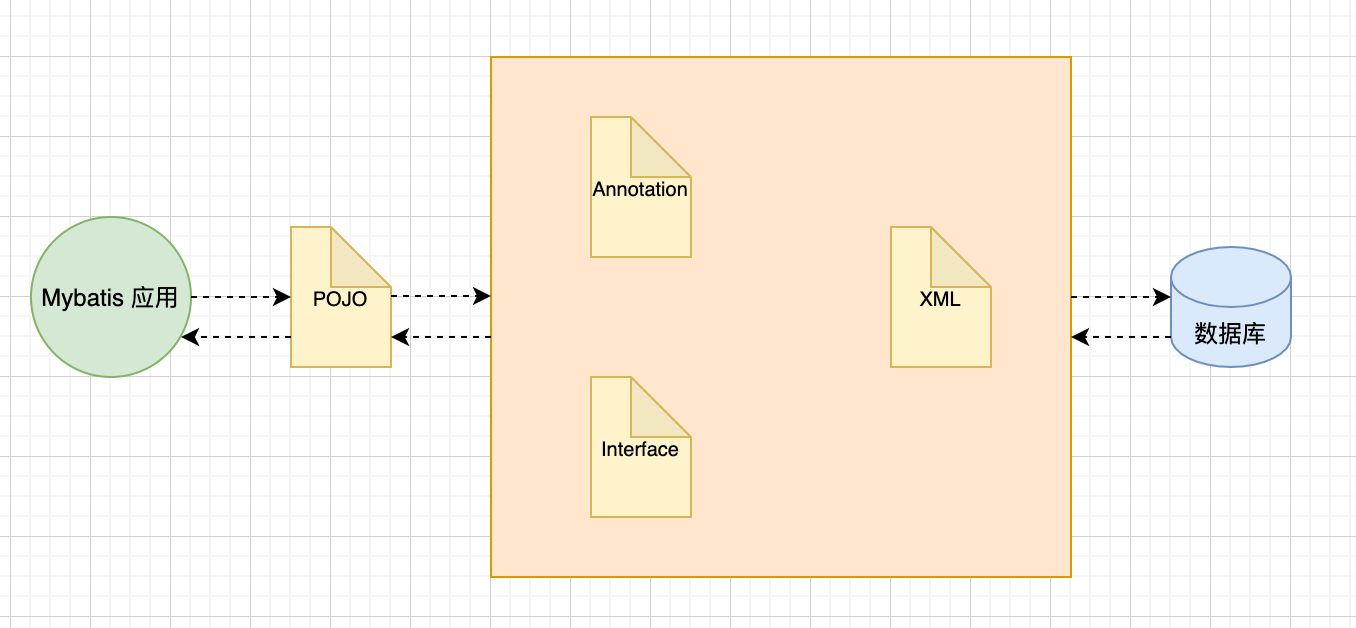
Mybatis 需要提供的映射文件包含以下三个部分:
- SQL
- 映射规则
- POJO
快速入门
待补充。
生命周期
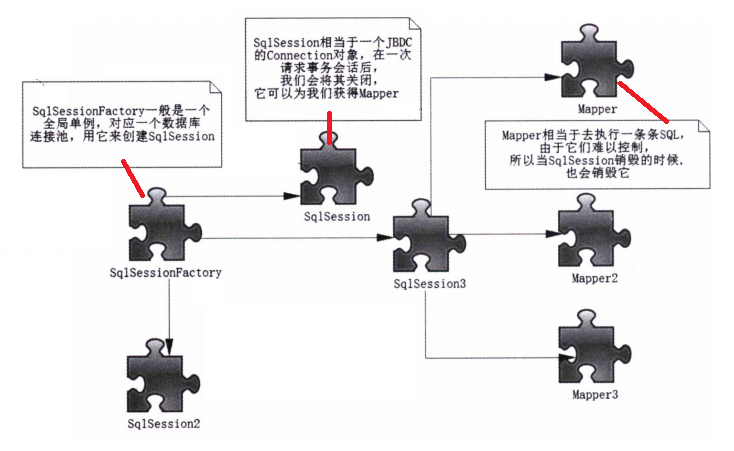
任何事物都有生命周期,Mybatis 也不例外,简单来讲其核心包括以下类:
SqlSessionFactoryBuilder:相当于一个入口,能让XMLConfigBuilder类解析所有 XML 文件并将数据返回给Configuration类,之后根据Configuration的数据来构建SqlSessionFactory;Configuration:解析的 XML 文件中配置的数据将存入该类;SqlSessionFactory:相当于数据库,而一个数据库可以有多个连接;SqlSession:获取 SQL 语句参数但交由代理者执行,返回执行的结果;Mapper:一个接口,通过动态代理去执行 SQL,SqlSession一般使用这种方式去执行SQL。
SqlSessionFactoryBuilder
SqlSessionFactoryBuilder将利用 XML 文件或 Java 编码获得的资源来构建SqlSessionFactory,构建完作用结束应将它废弃并回收。所以它的生命周期只存在于方法的内部,作用就是生成 SqlSessionFactory 对象。
那么,Mybatis 又是如何通过SqlSessionFactoryBuilder来构建SqlSessionFactory呢?
具体可以分为两步:
- ① 通过
org.apache.ibatis.builder.xml.XMLConfigBuilder解析配置的 XML 文件,读出配置参数,并将读取的数据存入org.apache.ibatis.session.Configuration类中(Mybatis 几乎所有的类都是存在此处) - ② 使用
Configuration对象去创建SqlSessionFactory,它是一个接口而不是实现类,其实现类为org.apache.ibatis.session.defauts.DefaultSqlSessionFactory,这是 Mybatis 提供的,默认情况下会使用到该类。
Configuration
SqlSessionFactory构建中最重要的就是Configuration啦,其作用包括:
- 读入配置文件:基础配置的 XML 文件(如
mybatis-config.xml)和映射器的 XML 文件 - 初始化基础配置:比如 Mybatis 的别名,一些重要的类对象,如插件、映射器、
ObjectFactory和typeHander对象。 - 提供单例:为后续创建
SqlSessionFactory服务并提供配置参数 - 执行一些重要的对象方法,初始化配置信息。
Mybatis 的配置信息均来自于此,我们后期所有的配置都会被读入其中并保存为一个单例。
那么,Configuration又是如何构建的呢?
Configuration是通过XMLConfiguration去构建的。
具体而言,包含以下三步骤:
- 首先,Mybatis 会读出所有 XML 配置的信息
- 其次,将这些信息保存到
Configuration类的单例中 - 最后,一般会将下面的信息初始化:
properties:全局参数settings:设置typeAliases:别名typeHander:类型处理器ObjectFactory:对象plugin:插件environment:环境DatabaseIdProvider:数据库标识Mapper:映射器
这些,我们将在 Mybatis 主配置文件中详细介绍。
SqlSessionFactory
SqlSessionFactory的作用是创建一个代表会话的SqlSession(相当于JDBC的Connection对象)。
问:SqlSessionFactory应存在多久呢?
答:由于每次应用需要访问数据库时,均需通过SqlSessionFactory创建SqlSession,因此SqlSessionFactory应该在 Mybatis 的整个生命周期中。
问:SqlSessionFactory应当创建多个嘛?
答:若多次创建同一个数据库的SqlSessionFactory,每次创建都会打开更多的数据库连接(Connection)资源,那么连接资源就很快就会被耗尽。
因此SqlSessionFactory的责任是唯一的,就是创建SqlSession,所以对它我们果断采用单例模式,使每一个数据库只对应一个SqlSessionFactory。
这么做的目的在于:管理好数据库资源的分配,可避免过多的连接使资源被耗尽。
那么,我们可以写一个单例的 SqlSessionFactory 工具类:1
2
3
4
5
6
7
8
9
10
11
12
13
14
15
16
17
18
19
20
21
22
23
24
25
26
27import ...
public class SqlSessionFactoryUtil {
private static SqlSessionFactory sqlSessionFactory = null;
//类线程锁
private static final Class CLASS_LOCK = SqlSessionFactoryUtil.class;
//私有化构造函数
private SqlSessionFactoryUtil() {
}
public static SqlSessionFactory getSqlSessionFactory() {
String resource = "mybatis-config.xml";
InputStream in = null;
if (sqlSessionFactory == null){
try {
in = Resources.getResourceAsStream(resource);
} catch (IOException e) {
e.printStackTrace();
}
}
synchronized (CLASS_LOCK){
if (sqlSessionFactory == null){
sqlSessionFactory = new SqlSessionFactoryBuilder().build(in);}
}
return sqlSessionFactory;
}
}
SqlSession
SqlSession是一个接口类,它类似于公司的前台客服妹子,充当着门面的作用,而真正干活的却是Executor接口(可以认为是公司的技术人员)。
假设我是顾客找你们公司干活,只需要告诉前台妹子(SqlSession)相关信息(参数),要做什么东西,过段时间妹子会把结果给我。
在这个过程中,我只关心:
- 要给妹子(
SqlSession)什么信息(功能和参数) - 妹子返回的结果(
Result)
我并不关心技术人员(Exector)是怎么为我工作的,只要前台妹子告诉技术人员就知道如何为我工作,这个步骤对我而言是个黑箱操作。
详细来说,SqlSession:
- 相当于
JDBC的一个Connection对象,生命周期应该是在请求数据库处理事务的过程中 - 是一个线程不安全的对象,多线程操作数据库需要注意其隔离级别,数据库锁等相关特性
- 会消耗数据库的连接池资源,创建后应及时关闭
- 存活于一个应用的请求和操作中,可以执行多条 SQL,这保证了事务的一致性
SqlSession的用途主要有 2 种(常用第一种):
- 获取 Mapper 代理对象,让 Mapper 代理对象通过命名空间和方法名找到对应的 SQL,发送给数据库执行后返回结果。
- 可直接通过命名信息去执行 SQL 返回结果。在
SqlSession层我们可以通过update、insert、select、delete等方法,带上 SQL 的id来操作在 XML 中配置好的 SQL,从而完成我们的工作;同时它也支持事务,通过commit、rollback方法提交或者回滚事务。
Mapper
Mapper是一个接口,而没有任何实现类,它的作用是发送 SQL,然后返回我们需要的结果,或者执行 SQL 从而修改数据库的数据,因此它应该在一个SqlSession事务方法之内,是一个方法级别的东西。它就如同JDBC的一条 SQL 语句的执行,它最大的范围和SqlSession是相同的。
主配置文件元素
下面为 Mybatis 主配置 XML 文件(一般命名为mybatis-config.xml)的层次结构:
1 |
|
这便是 Mybatis 全部的配置元素,具体可以去 Mybatis 官方文档了解其详细作用。
由于 Mybatis 一般都会与其他框架整合,所以较常使用的元素并不多:
<properties>:配置数据库(学习 Mybatis 时需要了解)<typeAliases>:定义类型别名<mappers>:引入配置文件
<typeAliases> 元素
什么是别名?
别名(typeAliases)是一个指代的名称。
由于 Mybatis 的类全限定名过长,所以我们希望用一个简短的名称去指代它来方便的在 Mybatis 上下文中进行实现,这个时候就可以使用别名了。
别名的种类
一个typeAliases的实例是在解析配置文件时生成的,然后长期保存在Configuration对象中,别名在 MyBatis 里面分为两类:
- MyBatis 系统定义别名
- 自定义别名
注:在 MyBatis 中别名是不区分大小写的。
MyBatis 系统定义别名
MyBatis 内置的 Java 类别名如下图:
| 别名 | 映射的类型 | 支持数组 |
|---|---|---|
| _byte | byte | 是 |
| _long | long | 是 |
| _short | short | 是 |
| _int | int | 是 |
| _integer | int | 是 |
| _double | double | 是 |
| _float | float | 是 |
| _boolean | boolean | 是 |
| string | String | 否 |
| byte | Byte | 是 |
| long | Long | 是 |
| short | Short | 是 |
| int | Integer | 是 |
| integer | Integer | 是 |
| double | Double | 是 |
| float | Float | 是 |
| boolean | Boolean | 是 |
| date | Date | 是 |
| decimal | BigDecimal | 是 |
| bigdecimal | BigDecimal | 是 |
| object | Object | 是 |
| map | Map | 否 |
| hashmap | HashMap | 否 |
| list | List | 否 |
| arraylist | ArrayList | 否 |
| collection | Collection | 否 |
| iterator | Iterator | 否 |
| ResultSet | ResultSet | 否 |
自定义别名
若想自定义别名,就需要使用<typeAliases>元素了:
① 单独给 POJO 类定义别名:
1
2
3<typeAliases>
<typeAlias type="cn.wk.mybatis.pojo.User" alias="User"/>
</typeAliases>② 自动扫描 POJO 包(常用):
1
2
3<typeAliases>
<package name="cn.wk.mybatis.pojo"/>
</typeAliases>
若 POJO 类过多,配置起来非常麻烦,所以 Mybaits 允许我们通过自动扫描的形式自定义别名,上面扫描cn.wk.mybatis.pojo包下的所有 POJO 类,自动将每个类的别名设置其类名(之后在配置文件中大小写类名均可使用)
<typeHandlers> 元素
typeHandlers 简介
MyBatis 在预处理语句(PreparedStatement)中设置一个参数时,或者从结果集(ResultSet)中取出一个值时,都会使用注册了的typeHandler进行处理。
为什么需要typeHandler呢?
我们知道在 Java 中存在各种各样的数据类型,而在数据库中的数据类型也五花八门(不同来源的数据库数据类型也有区别),当 Java 进行以下操作时是需要进行两端的数据类型关联映射的:
- Java 存数据入数据库中:需要将 Java 的数据类型 –> 数据库的数据类型
- Java 从数据库中取出数据:需要将数据库的数据类型 –> Java 的数据类型
在 Mybatis 中,就是通过typeHandler进行映射处理的。
typeHandler常用的配置为 Java 类型(javaType)、JDBC 类型(jdbcType)。typeHandler的作用就是将参数从 javaType 转化为 jdbcType,或者从数据库取出结果时把 jdbcType 转化为 javaType。
typeHandlers 分类
typeHandler和别名一样,分为两种:
- MyBatis 系统定义
- 用户自定义
MyBatis 系统定义
MyBatis 系统内部定义了一系列的typeHandler,我们可以在源码类org.apache.ibatis.type.TypeHandlerRegistry中找到它们(部分):1
2
3
4
5
6
7
8
9
10
11
12
13public final class TypeHandlerRegistry {
...
public TypeHandlerRegistry() {
this.register((Class)Boolean.class, (TypeHandler)(new BooleanTypeHandler()));
this.register((Class)Boolean.TYPE, (TypeHandler)(new BooleanTypeHandler()));
this.register((JdbcType)JdbcType.BOOLEAN, (TypeHandler)(new BooleanTypeHandler()));
this.register((JdbcType)JdbcType.BIT, (TypeHandler)(new BooleanTypeHandler()));
this.register((Class)Byte.class, (TypeHandler)(new ByteTypeHandler()));
this.register((Class)Byte.TYPE, (TypeHandler)(new ByteTypeHandler()));
this.register((JdbcType)JdbcType.TINYINT, (TypeHandler)(new ByteTypeHandler()));
this.register((Class)Short.class, (TypeHandler)(new ShortTypeHandler()));
...
}
这些内置类型处理器包括:
| 类型处理器 | Java 类型 | JDBC 类型 |
|---|---|---|
| BooleanTypeHandler | java.lang.Boolean, boolean | 数据库兼容的 BOOLEAN |
| ByteTypeHandler | java.lang.Byte, byte | 数据库兼容的 NUMERIC 或 BYTE |
| ShortTypeHandler | java.lang.Short, short | 数据库兼容的 NUMERIC 或 SHORT INTEGER |
| IntegerTypeHandler | java.lang.Integer, int | 数据库兼容的 NUMERIC 或 INTEGER |
| LongTypeHandler | java.lang.Long, long | 数据库兼容的 NUMERIC 或 LONG INTEGER |
| FloatTypeHandler | java.lang.Float, float | 数据库兼容的 NUMERIC 或 FLOAT |
| DoubleTypeHandler | java.lang.Double, double | 数据库兼容的 NUMERIC 或 DOUBLE |
| BigDecimalTypeHandler | java.math.BigDecimal | 数据库兼容的 NUMERIC 或 DECIMAL |
| StringTypeHandler | java.lang.String | CHAR, VARCHAR |
| ClobTypeHandler | java.lang.String | CLOB, LONGVARCHAR |
| NStringTypeHandler | java.lang.String | NVARCHAR, NCHAR |
| NClobTypeHandler | java.lang.String | NCLOB |
| ByteArrayTypeHandler | byte[] | 数据库兼容的字节流类型 |
| BlobTypeHandler | byte[] | BLOB, LONGVARBINARY |
| DateTypeHandler | java.util.Date | TIMESTAMP |
| DateOnlyTypeHandler | java.util.Date | DATE |
| TimeOnlyTypeHandler | java.util.Date | TIME |
| SqlTimestampTypeHandler | java.sql.Timestamp | TIMESTAMP |
| SqlDateTypeHandler | java.sql.Date | DATE |
| SqlTimeTypeHandler | java.sql.Time | TIME |
| ObjectTypeHandler | Any | OTHER 或未指定类型 |
| EnumTypeHandler | Enumeration Type | VARCHAR 或任何兼容的字符串类型,存储枚举的名称(而不是索引) |
| EnumOrdinalTypeHandler | Enumeration Type | 任何兼容的NUMERIC或DOUBLE类型,存储枚举的索引(而不是名称) |
用户自定义
一般而言,MyBatis 系统定义的typeHandler已经能够应付大部分的场景了,但是有时候遇到特殊的需要,就需要我们去自定义了。
什么时候可能用到自定义处理器呢?
举个例子,我想把某个 Java 对象 以 Json 字符串的形式存入数据库,然后获取的时候将 Json 字符串数据转换为 Java 对象,这个时候靠系统内置的肯定是不行了,那就自定义实现typeHandler呗。
那么,如何自定义实现一个typeHandler呢?
实现一个TypeHandler<T>接口并重写其方法:1
2
3
4
5
6
7
8
9
10
11
12
13
14
15
16
17
18
19
20
21
22
23
24
25
26
27({List.class})
(JdbcType.LONGVARCHAR)
public class JsonTypeHandler implements TypeHandler<List> {
public void setParameter(PreparedStatement ps, int i, List parameter, JdbcType jdbcType) throws SQLException {
ps.setString(i, JSON.toJSONString(parameter));
}
public List getResult(ResultSet rs, String columnName) throws SQLException {
String resultArray = rs.getString(columnName);
return JSON.parseArray(resultArray);
}
public List getResult(ResultSet rs, int columnIndex) throws SQLException {
String resultArray = rs.getString(columnIndex);
return JSON.parseArray(resultArray);
}
public List getResult(CallableStatement cs, int columnIndex) throws SQLException {
String resultArray = cs.getString(columnIndex);
return JSON.parseArray(resultArray);
}
}
之后注册到TypeHandlerRegistry。
最后,在xml文件中使用即可。
<mappers> 元素
<mappers>元素可以引入映射文件,Mybatis 提供了 4 种方法:
① 用文件路径引入映射文件:
1
2
3<mappers>
<mapper resource="cn/wk/mybatis/mapper/UserMapper.xml"/>
</mappers>② 用类路径映入映射文件:
1
2
3<mappers>
<mapper class="cn.wk.mybatis.mapper.UserMapper"/>
</mappers>③ url 引入(略)
- ④ 用包名引入多个映射文件(常用):
1
2
3<mappers>
<package name="cn.wk.mybatis.mapper"/>
</mappers>
注意哦:若是 Maven 项目,且映射文件放在src/main/java目录而未放在resources目录下,需在pom.xml文件添加下面代码,否则会报找不到文件的错。
1 | <build> |
映射器
映射器可以说是 Mybatis 最重要的一部分了,那么什么是映射器呢?
什么是映射器?
映射器由Mapper接口和XML 文件(或注解)共同组成。
光这样解释好像不太容易理解,思考下面的问题:
若不使用 Mybatis,在dao层我们将会怎么查询一个用户的信息?
① 首先,我们一般会在dao层写一个这种形式的接口:
1 | public interface UserDao{ |
② 其次,在该接口的具体实现类编写SQL语句去查询用户的信息:1
2
3
4
5public class UserDaoImpl{
User queryUserById(int id){
// 通过 JDBC 查询后返回结果集并封装进 User 对象中
}
}
③ 最后,就能在Service层调用接口去获得查询的数据啦:1
2
3
4
5
6
7
8
9
10
11
12
13
14
15// Service 接口
public class UserService{
User queryUserById(int id);
}
// Service 实现类
public class UserServiceImpl{
private UserDao userDao;
User queryUserById(int id){
userDao = new UserDaoImpl();
User user = userDao.queryUserById(id);
}
}
那么在 Mybatis 中,又是如何完成上述步骤的呢?
在 Mybatis 中,将Dao层的UserDaoImpl实现类替换成了一个xml文件,我们仅需定义一个这样的文件:1
2
3
4
5
6
7
8
9
<mapper namespace="cn.wk.mybatis.mapper.UserDao">
<select id="queryUserById" parameterType="int" resultType="User">
  select * from user where id = #{id}
</select>
</mapper>
然后,将Service层的UserServiceImpl小小地改造一下,即可实现相同的功能:1
2
3
4
5
6
7// Service 实现类
public class UserServiceImpl{
private UserDao userDao;
User queryUserById(int id){
User user = userDao.queryUserById(id);
}
}
或许可能现在你不太明白为什么,但你现在可以粗暴地把这个xml文件当作原先的接口实现类。
注意哦:xml 文件必须在 Mybatis 主配置文件引入方可起作用。
为什么使用映射器?
映射器可以:
- 定义参数类型
- 描述 SQL 语句
- 定义查询结果和 POJO 的关系
- 描述缓存
XML 文件元素
XML 文件的元素见下表:
| 元素 | 描述 | 备注 |
|---|---|---|
| select | 查询语句,最常用最复杂元素之一 | 可以自定义参数,返回结果集等 |
| insert | 插入语句 | 执行后返回一个整数代表插入条数 |
| update | 更新语句 | 执行后返回一个整数代表更新条数 |
| delete | 删除语句 | 执行后返回一个整数代表删除条数 |
| sql | 允许定义一部分 SQL 在另处复用 | 与 include 配套使用 |
| include | 复用定义的 sql | 与 sql 配套使用 |
| id | 对应 Mappe r接口的方法名 | 命名空间和 id 组合必须唯一 |
| parameterType | 传递的的参数类型 | 如简单类型、对象类型 |
| resultType | 描述数据库结果集映射的简单类型或对象 | 可配置映射规则 |
| resultMap | 描述数据库结果集映射的复杂对象 | 可配置映射规则、级联等 |
| cache | 给定命名空间的局部缓存配置 | – |
| cache-ref | 引用其他命名空间的缓存配置 | – |
映射器的实现
映射器的实现方式存在两种:
- XML 文件方式(常用)
- 注解方式
XML 文件方式
第一步,给出一个 Java 接口:1
2
3
4
5
6
7
8
9
10
11
12
13package cn.wk.mybatis.mapper;
import cn.wk.mybatis.pojo.User;
public interface UserMapper {
/**
* 根据id查询用户
*
* @param id
* @return
*/
User queryUserById(int id) ;
}
第二步,给出一个 XML 映射文件UserMapper.xml:1
2
3
4
5
6
7
8
9
<mapper namespace="cn.wk.mybatis.mapper.UserMapper">
<select id="queryUserById" parameterType="int" resultType="User">
select * from user where id = #{id}
</select>
</mapper>
其中,#{id}为这条 SQL 的参数,对参数而言,其实有两种写法:
#{ }解析为一个 JDBC 预编译语句的参数标记符,变量替换完成在 DBMS 中。(推荐)${ }仅仅为一个纯粹的 String 替换,在动态 SQL 解析阶段将会进行变量替换,DBMS 拿到的即为执行的 sql。(可能有 SQL 注入问题)- 举个例子:
#{str}出来的效果是'str',${str}出来的效果是str
注意哦:该 XML 映射文件必须在mybatis-config.xml中引入才生效:
1 | <!--定义别名--> |
对该 XML 映射文件而言:
- 必须在
mybatis-config.xml文件配置,因为 Mybatis 会读取这个配置文件,生成映射器。 - 定义了一个命名空间为
cn.wk.mybatis.mapper.UserMapper的 SQL Mapper,这个命名空间与定义的接口路径必须一致,因为接口和xml文件需要通过其进行关联 - 用一个
select元素定义了一个查询 SQL,id为queryUserById,和接口里的方法必须一样,parameterType为传入的参数,resultType则为 SQL 语句返回的类型,这里为User类型,其已在mybatis-config.xml中定义别名
来看看User这个 POJO:1
2
3
4
5
6
7
8
9
10package cn.wk.mybatis.pojo;
public class User {
private int id;
private String username;
private String password;
private String name;
private int telephone;
//getter、setter方法的代码省略
我们来测试查询一下:1
2
3
4
5
6
7
8
9
10
11
12
13
14
15
16
17
18
19
20
21
22
23
24
25
26
27
28
29
30
31
32
33public class UserServiceImpl implements UserService {
SqlSessionFactory sqlSessionFactory = SqlSessionFactoryUtil.getSqlSessionFactory();
public User queryUserById(int id) {
SqlSession sqlSession = null;
User user = null;
try {
sqlSession = sqlSessionFactory.openSession();
UserMapper mapper = sqlSession.getMapper(UserMapper.class);
user = mapper.queryUserById(id);
sqlSession.commit();
} catch (Exception e) {
e.printStackTrace();
sqlSession.rollback();
} finally {
sqlSession.close();
}
return user;
}
public void test() {
UserService userservice = new UserServiceImpl();
User user = userservice.queryUserById(1);
System.out.println(user);
System.out.println(user.getId());
System.out.println(user.getName());
System.out.println(user.getPassword());
System.out.println(user.getTelephone());
System.out.println(user.getUserName());
}
}
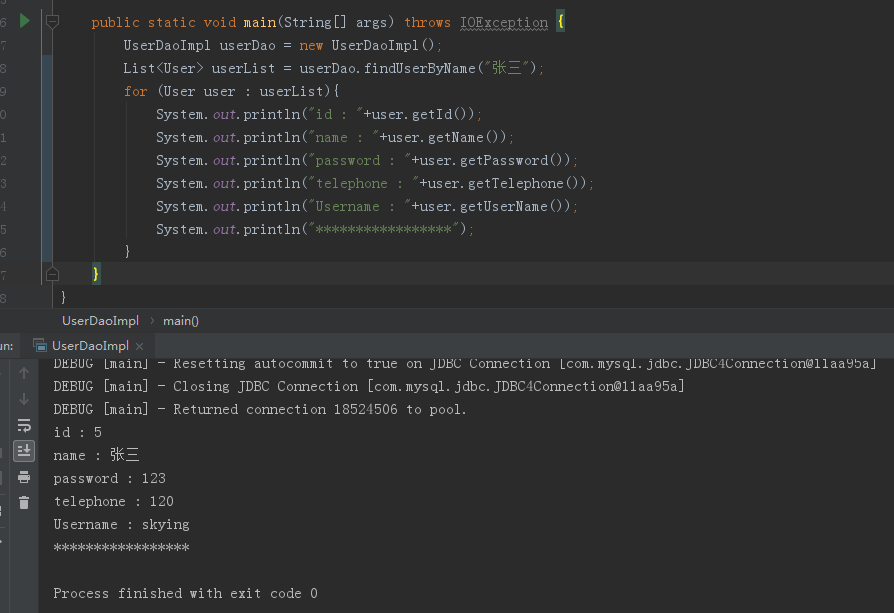
运行结果:1
2
3
4
5
6cn.wk.mybatis.pojo.User@709ba3fb
1
露西
123
0
lucy
和数据库相同: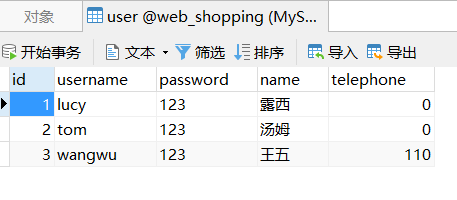
注解方式
1 | package cn.wk.mybatis.mapper; |
这里使用@Select注解注入了和 XML 文件一样的select元素,Mybatis 便会读取这条 SQL,并将参数id传递进 SQL。
注意哦:一般参数较少时可以使用这种方式。
疑问
我们使用的仅仅是Mapper接口和一个XML文件(或注解)去实现映射器,接口不是实现类,一个没有实现类的接口怎么能运行呢?
其实这里运用到了 Java 的动态代理进行实现,简单来讲:我们会在 Mybatis 上下文中描述这个接口,通过SqlSession的getMapper(Mapper接口.class)方法会为该接口生成代理类对象,代理类对象会根据 XML 配置文件中的接口全路径+方法名去匹配,找到对应的 XML 文件(或注解)的 SQL 语句去执行,最后返回结果。
若对上述概念不清晰的话,某种程度上可以把XML文件理解为Mapper接口的实现类。
参数传递
参数传递指的是将 Java 中的数据类型作为参数传入到 XML 文件里 SQL 语句的占位符中,这些参数可以是:
- 简单数据类型(如基本数据类型和简单的引用类型
String之类的) - 复杂数据类型(如
Map类型、自定义的对象类型)
① 传递简单数据类型的参数
若我们想通过一个id查找用户的全部信息,可以把id当作传递的参数,返回获得的用户对象。1
2
3<select id="queryUserById" parameterType="int" resultType="User">
select * from user where id = #{id}
</select>
Mybatis 自动提供了 Java 中许多类的别名(见<typeAliases>元素部分),所以在parameterType中可以使用int。
② 传递多个参数
若想向数据表中插入一条新的用户信息,那么必定要传递多个参数。
Mybatis 为此提供了三种实现方式:
- Map 传递参数(基本不用)
- 注解传递参数(常用)
- Java Bean 传递参数(常用)
使用 Map 传递参数(了解即可)
定义 Mapper 接口:1
2
3public interface UserMapper {
int insertUserByMap(Map<String,String> params);
}
XML 文件:1
2
3
4
5
6
7
8
9
<mapper namespace="cn.wk.mybatis.mapper.UserMapper">
<insert id="insertUserByMap" parameterType="map">
INSERT INTO user(username,password,name,telephone) VALUES(#{username},#{password},#{name},#{telephone})
</insert>
</mapper>
Service 层实现类:1
2
3
4
5
6
7
8
9
10
11
12
13
14
15
16
17
18
19
20public class UserServiceImpl implements UserService {
SqlSessionFactory sqlSessionFactory = SqlSessionFactoryUtil.getSqlSessionFactory();
public int insertUserByMap(Map<String, String> params) {
SqlSession sqlSession = null;
try {
sqlSession = sqlSessionFactory.openSession();
UserMapper mapper = sqlSession.getMapper(UserMapper.class);
int i = mapper.insertUserByMap(params);
sqlSession.commit();
return i;
} catch (Exception e) {
e.printStackTrace();
sqlSession.rollback();
} finally {
sqlSession.close();
}
return -1;
}
}
测试:1
2
3
4
5
6
7
8
9
10
11
public void testInsertUserByMap(){
UserService userService = new UserServiceImpl();
Map<String, String> paramsMap = new HashMap<>();
paramsMap.put("username", "william");
paramsMap.put("password", "123456789");
paramsMap.put("name", "tim");
paramsMap.put("telephone", "1501234567");
int i = userService.insertUserByMap(paramsMap);
System.out.println(i);
}
运行测试代码后控制台输出1
使用注解传递参数
通过使用 Mybatis 的org.apache.ibatis.annotations.Param参数注解@Param()也可传递参数。
具体操作方法是,把 UserMapper 接口修改为下面的形式:1
2
3
4
5import org.apache.ibatis.annotations.Param;
public interface UserMapper {
int insertUserByAnnotation(@Param("username") String username, @Param("password") String password, @Param("name") String name, @Param("telephone") int telephone);
}
再把 XML 文件修改为无需定义参数类型:1
2
3<insert id="insertUserByAnnotation">
INSERT INTO user(username,password,name,telephone) VALUES(#{username},#{password},#{name},#{telephone})
</insert>
Service 层实现类:1
2
3
4
5
6
7
8
9
10
11
12
13
14
15
16
17
18
19public class UserServiceImpl implements UserService {
SqlSessionFactory sqlSessionFactory = SqlSessionFactoryUtil.getSqlSessionFactory();
public int insertUserByAnnotation(String username, String password, String name, int telephone) {
SqlSession sqlSession = null;
try {
sqlSession = sqlSessionFactory.openSession();
UserMapper mapper = sqlSession.getMapper(UserMapper.class);
int i = mapper.insertUserByAnnotation(username, password, name, telephone);
sqlSession.commit();
return i;
} catch (Exception e) {
e.printStackTrace();
sqlSession.rollback();
} finally {
sqlSession.close();
}
return -1;
}
测试:1
2
3
4
5
6
public void testInsertUserByAnnotation(){
UserService userService = new UserServiceImpl();
int i = userService.insertUserByAnnotation("士大夫", "123", "皇帝", 222);
System.out.println(i);
}
运行测试代码后控制台输出1
使用 Java Bean 传递参数
若我们想在数据表user中插入一条新的数据,那么应该要传递多个参数,我们可以使用Java Bean各个属性来充当这些参数。因为 Mybatis 会提供自动映射的功能,自动映射可以在主配置文件setting元素中配置autoMappingBehavior属性值来设置其策略,当它不设置为NONE的时候,只要返回的 SQL 列名和JavaBean的属性一致,Mybatis 就会帮助我们回填这些字段而无需任何配置,它可以在很大程度上简化我们的配置工作。
在实际的情况中,大部分的数据库规范都要求每个单词用下划线分隔,而 Java 则是用驼峰命名法来命名,于是使用列的别名就可以使得 Mybatis 自动映射,或者直接在配置文件中开启驼峰命名方式。
定义 Mapper 接口:1
2
3public interface UserMapper {
int insertUserByJavaBean(User user);
}
XML 文件:1
2
3<insert id="insertUserByJavaBean" parameterType="User" >
INSERT INTO user(username,password,name,telephone) VALUES(#{username},#{password},#{name},#{telephone})
</insert>
Service 层实现类:1
2
3
4
5
6
7
8
9
10
11
12
13
14
15
16
17
18
19
20public class UserServiceImpl implements UserService {
SqlSessionFactory sqlSessionFactory = SqlSessionFactoryUtil.getSqlSessionFactory();
public int insertUserByJavaBean(User user) {
SqlSession sqlSession = null;
try {
sqlSession = sqlSessionFactory.openSession();
UserMapper mapper = sqlSession.getMapper(UserMapper.class);
int i = mapper.insertUser(user);
sqlSession.commit();
return i;
} catch (Exception e) {
e.printStackTrace();
sqlSession.rollback();
} finally {
sqlSession.close();
}
return -1;
}
}
测试类:1
2
3
4
5
6
7
8
9
10
11
public void insertUserByJavaBean() {
UserServiceImpl userService = new UserServiceImpl();
User user = new User();
user.setUserName("钱6");
user.setPassword("1231313");
user.setTelephone(110);
user.setName("小王");
int i = userService.insertUserByJavaBean(user);
System.out.println(i);
}
运行测试代码后控制台输出1
三种方式的抉择
既然有这么多实现方式,那么在项目中到底应该选择哪种方式呢?
- Map 传递参数。因为 Map 导致业务可读性的丧失,使得后续扩展和维护很困难,已废弃该方式
@Param注解传递多个参数,受到参数个数(n)的影响。当n<=5时,它是最佳的传参方式,它比用 Java Bean 更好,因为它更加直观;当n> 5 时,多个参数调用时比较麻烦- 所以当参数个数多于
5个时,建议使用JavaBean方式
结果集映射
结果集映射指的是将执行 SQL 语句后从数据库中返回的数据与 Java 中的数据类型关联起来。
这些映射的结果集可能非常简单,也可能非常复杂,Mybatis提供了两种映射结果集的元素:
resultType:映射简单的结果集,如int,稍微复杂一点的如SELECT查询的用户信息可以映射为一个 Java Bean 对象resultMap:映射复杂的结果集,如多表连接查询的数据
① resultType 映射结果集(简单)
resultType元素可以处理简单的映射结果集。
1) 返回单一类型时:
比如insert,update,delete操作执行成功后返回的为int整型,此时可将resultType指定为int。
由于这种情况太常见了,因此此时可以省略resultType,如下面的代码:1
2
3<insert id="insertUserByJavaBean" parameterType="User">
INSERT INTO user(username,password,name,telephone) VALUES(#{username},#{password},#{name},#{telephone})
</insert>
下面为Mapper接口中的方法:1
int insertUserByJavaBean(User user);
2) 返回参数过多时:
可以将resultType设置为map(不常用)或一个JavaBean对象。
通过map可以将所有的列映射到HashMap的键上, 但此种方式比较麻烦,一般都使用Java Bean对象。
因此推荐使用一个 Java Bean 对象User类(常用):
1 | <select id="queryAllUser" resultType="User"> |
基于JavaBean的规范,User类有username,password,name,telephone 4个属性及对应的getter、setter方法:。这些属性对应了select语句中的列名。
对User和结果集的映射,MyBatis 其实在幕后会自动创建一个ResultMap,再基于属性名来映射查询出来的列到 Java Bean 的属性上。
换而言之,前面的相当于:1
2
3<select id="queryAllUser" resultType="User">
select username as "username",password as "password",name as "name",telephone as "telephone" from user where id = #{id}
</select>
注意哦:当数据库中的列名带有下划线时(如tb_username),映射会失败(查询的结果为null),此时需要使用上面的as来定义别名或者在主配置文件开启自动驼峰命名规则:
1 | <configuration> |
问:有时候其实不能定义别名,比如查询多表时你想同时显示一个表所有列名和另一个表部分列名,肯定是在 SQL 语句写表.*和另一个表的部分列名,那么此时如何定义别名呢?答:可以在一个Java Bean中编写一个表所有属性和另一个表部分属性。由于该操作比较麻烦,因此一般会使用resultMap来代替resultType,毕竟resultType仅仅是resultMap映射的一种罢了。
② resultMap 结果集映射(复杂)
resultMap是 Mybatis 里最复杂的元素,它不仅可以定义映射规则,还有更新级联、定制类型转化器的功能。
为什么使用 resultMap?
在某些时候,我们需要处理更为复杂的映射,比如数据库中的一对多、多对多关系,此时使用resultType就不太合适了,写起来非常麻烦,有多麻烦呢?
假设我们想查询一个订单表中所有有订单的顾客部分信息,我们会如何做呢?
首先我们会建立 2 个 POJO 对象,包括订单表对应的Order对象,顾客表对应的Customer对象。
通过上面 2 表查询的是订单表所有信息和顾客表部分信息,但现在仅仅需要订单表所有信息和顾客表部分信息。
若按照原先的做法,此时就必须再建一个包括订单表所有信息和顾客表部分信息的 POJO 对象。
但这种做法完全是没有必要的,因为编写了重复的代码。
重复代码?在 Java 中若对一些代码使用了多次,都是将其封装成方法后直接复用的,而 Mybatis 中的resultMap也是这么做的。
resultMap 元素组成
resultMap包含的元素比较复杂,所以得介绍一下:1
2
3
4
5
6
7
8
9
10
11
12
13<resultMap id="" type="">
<constructor>
<idArg></idArg>
<arg></arg>
</constructor>
<id column="" property=""></id>
<result column="" property=""></result>
<association property="" javaType=""></association>
<collection property="" javaType=""></collection>
<discriminator javaType="">
<case value=""></case>
</discriminator>
</resultMap>
其中reslultMap元素的id代表该resultMap的标识(因为resultMap可能有多个),type代表这你需要映射的 POJO(一般使用别名)。
这些子元素一般不会全部用到,但下面还是做个总结:
映射关系中,id元素代表这个对象的主键(允许多个主键,多个主键则称为联合主键):其中column标识数据库 SQL 的列名,property则代表 POJO 的某个属性。
而result元素和id不同的是:id是数据库表的主键,而result则是普通键。
association元素代表一对一关系,比如中国公民和身份证是一对一关系,订单和顾客也是一对一关系。
collection元素代表一对多关系,比如班级和学生是一对多关系。
discriminator是鉴别器,它可以根据实际选择采用哪个类作为实例,允许你根据特定的条件去关联不同的结果集。比如,人有男人和女人。你可以实例化一个人的对象,但是要根据情况用男人类或者用女人类去实例化。
association、collection、discriminator中的property代表 POJO 的某个属性,javaType代表属性所属的 POJO 对象。
级联
级联指多个对象之间的映射关系,使用级联可以提高查询效率。
1)一对一关系:
假设我们要查询订单表中有订单的顾客信息,其属于一对一关系(一个订单对应一个顾客)。
现在通过resultMap来查询,操作步骤如下:
首先创建两个类,一个Customer类,一个Order类(依赖Customer类):
1 | public class Customer{ |
其次,定义 Mapper 接口:1
2
3
4public interface OrderMapper {
// 查找订单的顾客信息
List<Order> queryOrderCustomerInfo();
}
XML 文件:1
2
3
4
5
6
7
8
9
10
11
12
13
14
15
16
17
18
19
20
21
22
23
24
25
26
27
28
29
<mapper namespace="cn.wk.mapper.OrderMapper">
<!-- 将整个查询的结果映射到 Order 中 -->
<resultMap id="orderCustomerResultMap" type="Order">
<!-- 订单信息 -->
<!-- id:Order 的主键,column 为其列名,property 为其对应 Java Bean 的属性-->
<id column="order_num" property="orderNum"></id>
<!-- result:Order 的普通键,column 为其列名,property 为其对应 Java Bean 的属性-->
<result column="order_date" property="orderDate"></result>
<result column="cust_id" property="custId"></result>
<!-- association:用于映射关联查询单个对象的信息 -->
<!-- property:要将关联查询的顾客信息映射到 Order 的哪个属性,javaType:该属性对应的 Java Bean 对象 -->
<association property="customer" javaType="Customer">
<!-- 顾客信息 -->
<id column="cust_id" property="custId"></id>
<result column="cust_name" property="custName"></result>
<result column="cust_address" property="custAddress"></result>
<result column="cust_zip" property="custZip"></result>
</association>
</resultMap>
<select id="queryOrderCustomerInfo" resultMap="orderCustomerResultMap">
SELECT orders.*,customers.cust_name,cust_address,cust_zip
FROM customers INNER JOIN orders
ON customers.cust_id = orders.cust_id
</select>
</mapper>
Service 层实现类:1
2
3
4
5
6
7
8
9
10
11
12
13
14
15
16
17
18
19
20public class OrderServiceImpl implements OrderService {
SqlSessionFactory sqlSessionFactory = SqlSessionFactoryUtil.getSqlSessionFactory();
public List<Order> queryOrderCustomerInfo() {
SqlSession sqlSession = null;
try {
sqlSession = sqlSessionFactory.openSession();
OrderMapper mapper = sqlSession.getMapper(OrderMapper.class);
List<Order> orderList = mapper.queryOrderCustomerInfo();
sqlSession.commit();
return orderList;
} catch (Exception e) {
e.printStackTrace();
sqlSession.rollback();
} finally {
sqlSession.close();
}
return null;
}
}
测试类:1
2
3
4
5
6
7
8
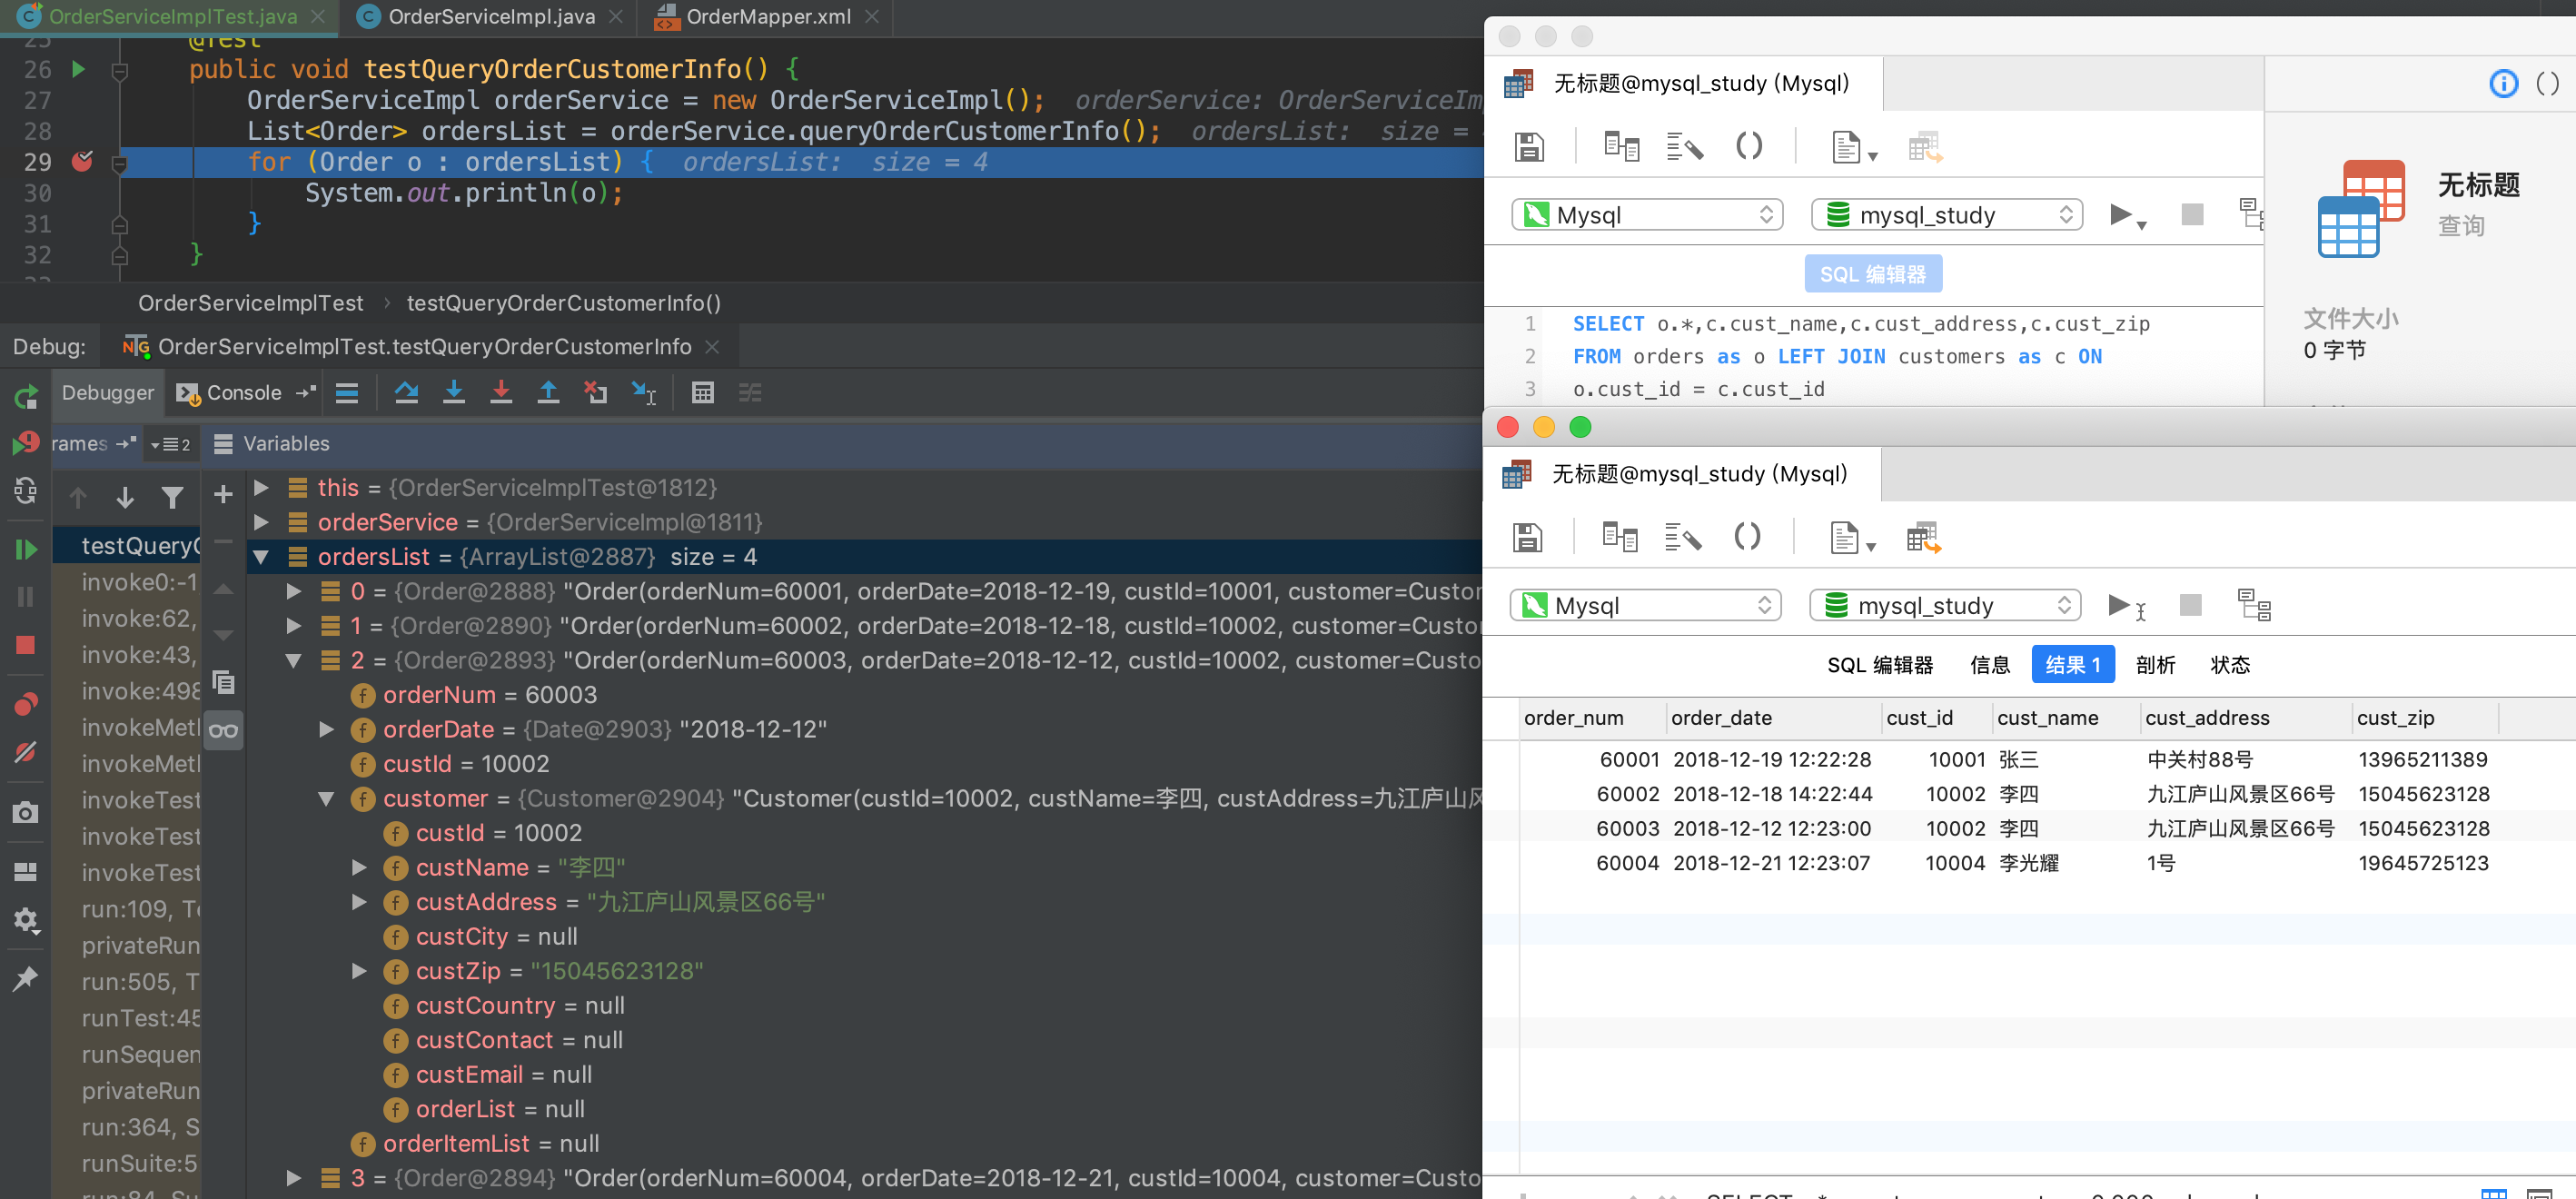
public void testQueryOrderCustomerInfo() {
OrderService orderService = new OrderServiceImpl();
List<Order> ordersList = orderService.queryOrderCustomerInfo();
for (Order o : ordersList) {
System.out.println(o);
}
}
测试结果:
2)一对多关系
假设我们要查询顾客所下订单的订单明细(商品编号,数量,价格)。
分析一下:其属于一对多关系:一个顾客对应一个订单,一个订单对应多个订单明细,那么一个顾客也对应多个订单明细。
先看下数据库的几张表:
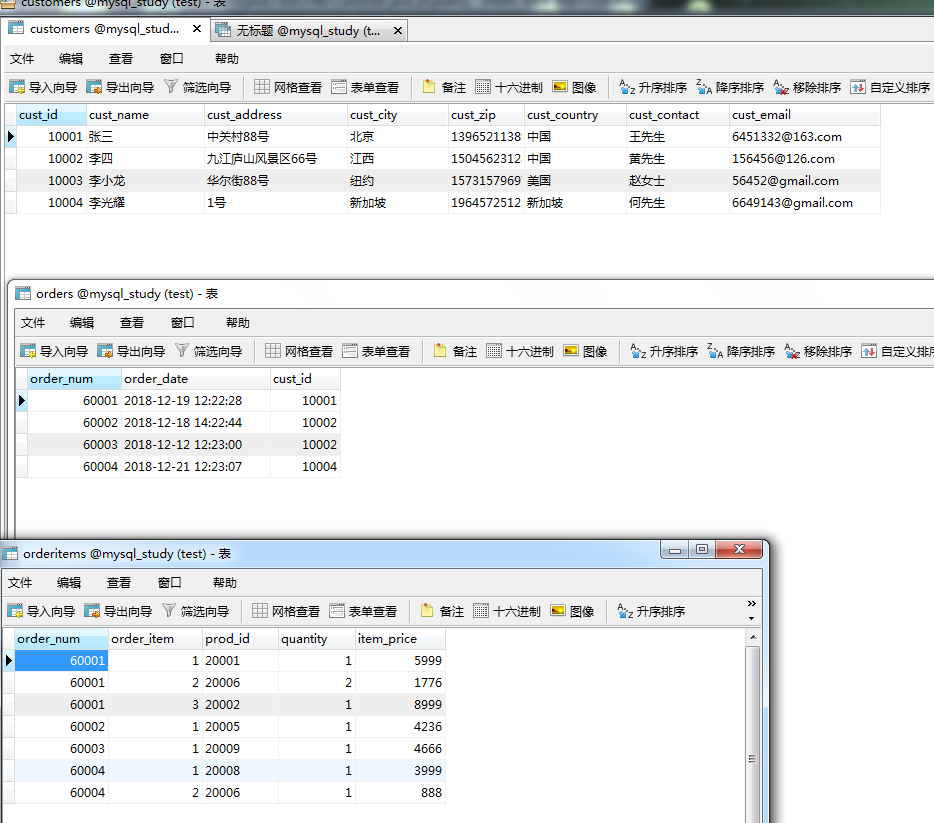
很显然,映射到 Java 中,有很多数据重复了,我们只想要以下的数据:

这该怎么处理呢?我们可以用集合来存储后面的 3 个orderitems信息,用resultMap来实现它:
首先在前面的Order类中添加OrderItem的集合1
2
3
4
5
6
7
8
9
10
11
12
13
14
15
16
17
18
19
20
21//订单明细
public class OrderItem {
private int orderNum;
private int orderItem;
private String prod_id;
private int quantity;
private BigDecimal itemPrice;
private Product product;
}
//订单
public class Order {
private int orderNum;
private Date orderDate;
private int custId;
private Customer customer;
private List<OrderItem> orderItemList;
}
接着定义 Mapper 接口方法:1
2
3
4
5
6public interface OrderMapper {
//查找订单的顾客信息
List<Order> queryOrderCustomerInfo();
//查找订单的顾客所下商品的信息(编号,数量,价格)
List<Order> queryOrderCustomerProductInfo();
}
XML 文件中的查询语句:1
2
3
4
5
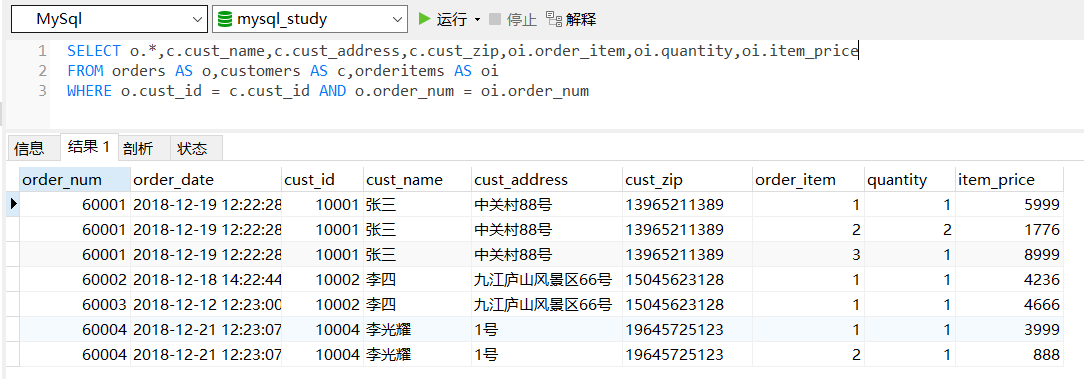
6<select id="queryOrderCustomerProductInfo" resultMap="orderCustomerProductResultMap">
SELECT o.*,c.cust_name,c.cust_address,c.cust_zip,oi.order_item ,oi.quantity,oi.item_price
FROM customers AS c,orders AS o,orderitems AS oi
WHERE c.cust_id = o.cust_id
AND o.order_num = oi.order_num
</select>
其中的resultMap映射:1
2
3
4
5
6
7
8
9
10
11
12
13
14
15
16
17
18
19
20
21
22
23
24
25<resultMap id="orderCustomerProductResultMap" type="Order">
<!--订单信息-->
<!--id:Order的主键,column为其列名,property为其对应的JavaBean的属性-->
<id column="order_num" property="orderNum"></id>
<!--result:Order的普通键,column为其列名,property为其对应的JavaBean的属性-->
<result column="order_date" property="orderDate"></result>
<result column="cust_id" property="custId"></result>
<!--association:用于映射关联查询单个对象的信息-->
<!--property:要将关联查询的顾客信息映射到Order的哪个属性,javaType:该属性对应的JavaBean对象-->
<association property="customer" javaType="Customer">
<!--顾客信息-->
<id column="cust_id" property="custId"></id>
<result column="cust_name" property="custName"></result>
<result column="cust_address" property="custAddress"></result>
<result column="cust_zip" property="custZip"></result>
</association>
<!--property:要将关联查询的顾客信息映射到Order的哪个属性,ofType:指定映射到list集合属性中pojo的类型-->
<collection property="orderItemList" ofType="OrderItem">
<!--订单商品明细-->
<id column="order_num" property="orderNum"></id>
<id column="order_item" property="orderItem"></id>
<result column="quantity" property="quantity"></result>
<result column="item_price" property="itemPrice"></result>
</collection>
</resultMap>
很显然,其中有很多代码与我们写一对一关系时的resultMap映射代码重复,那么我们继承那个映射就好了,改造一下下:1
2
3
4
5
6
7
8
9
10<resultMap id="orderCustomerProductResultMap" type="Order" extends="orderCustomerResultMap">
<!--property:要将关联查询的顾客信息映射到Order的哪个属性,ofType:指定映射到list集合属性中pojo的类型-->
<collection property="orderItemList" ofType="OrderItem">
<!--订单商品明细-->
<id column="order_num" property="orderNum"></id>
<id column="order_item" property="orderItem"></id>
<result column="quantity" property="quantity"></result>
<result column="item_price" property="itemPrice"></result>
</collection>
</resultMap>
Service 层实现类方法:1
2
3
4
5
6
7
8
9
10
11
12
13
14
15
16
17
18
19
20
21
22
23public class OrderServiceImpl implements OrderService {
SqlSessionFactory sqlSessionFactory = SqlSessionFactoryUtil.getSqlSessionFactory();
public List<Order> queryOrderCustomerProductInfo() {
SqlSession sqlSession = null;
try {
sqlSession = sqlSessionFactory.openSession();
OrderMapper mapper = sqlSession.getMapper(OrderMapper.class);
List<Order> orderList = mapper.queryOrderCustomerProductInfo();
sqlSession.commit();
return orderList;
} catch (Exception e) {
e.printStackTrace();
sqlSession.rollback();
} finally {
sqlSession.close();
}
return null;
}
}
测试类:1
2
3
4
5
6
7
8
public void testQueryOrderCustomerProductInfo() {
OrderServiceImpl orderService = new OrderServiceImpl();
List<Order> ordersList = orderService.queryOrderCustomerProductInfo();
for (Order o : ordersList) {
System.out.println(o);
}
}
测试结果:

3)多对多关系:
假设我们要查询顾客信息和顾客所下订单的订单明细中商品的详细信息
其属于多对多关系(查询),和前面几个例子不同的是,前面的订单和顾客是一对一关系(一个订单对应一个顾客),订单和订单明细是一对多关系,现在是多对多关系(一个顾客对应一个订单,一个订单对应多个订单明细,一个订单明细对应一个商品,即一个顾客可以买多个商品,一个商品和可以被多个顾客买,那么顾客和商品就是多对多关系),
先看下 4 张表:

从下面的查询结果可以看出id为10001的顾客张三购买了多个商品,商品智能手环被 2 个顾客买了。

那么我们该怎么写这个多对多映射呢?
很简单,一个顾客对应多个订单,那么我们就去顾客表的 POJO 对象中加入该订单集合及它的get,set方法:
1 | public class Customer{ |
然后,一个订单对应多个订单明细,我们就去订单表对应 POJO 对象中加入订单明细的集合及它的 get、set 方法(前面已经加过,这里就不贴代码了)。
一个订单明细又对应一个商品,那么我们又去订单明细表的 POJO 对象中加入商品对象及它的 get、set 方法1
2
3
4
5
6public class OrderItem {
//其他属性省略
private Product product;
//get,set方法省略
}
好了,我们可以去写 XML 文件了,首先select语句:1
2
3
4
5
6
7 <select id="queryCustomerAndProductInfo" resultMap="customerAndProductInfoResultMap">
SELECT o.*,c.cust_name,c.cust_address,c.cust_zip,oi.order_item ,oi.quantity,oi.item_price,p.prod_name,p.prod_desc
FROM customers AS c,orders AS o,orderitems AS oi,products AS p
WHERE c.cust_id = o.cust_id
AND o.order_num = oi.order_num
AND oi.prod_id = p.prod_id
</select>
然后是resultMap:1
2
3
4
5
6
7
8
9
10
11
12
13
14
15
16
17
18
19
20
21
22
23
24
25<resultMap id="customerAndProductInfoResultMap" type="Customer">
<!--顾客信息-->
<id column="cust_id" property="custId"/>
<result column="cust_name" property="custName"/>
<result column="cust_address" property="custAddress"/>
<result column="cust_zip" property="custZip"/>
<collection property="orderList" ofType="Order">
<!--订单信息:一个顾客对应多个订单-->
<id column="order_num" property="orderNum"/>
<result column="order_date" property="orderDate"/>
<result column="cust_id" property="custId"/>
<collection property="orderItemList" ofType="OrderItem">
<!--订单商品明细:一个订单对应多个订单明细-->
<id column="order_num" property="orderNum"/>
<id column="order_item" property="orderItem"/>
<result column="quantity" property="quantity"/>
<result column="item_price" property="itemPrice"/>
<association property="product" javaType="Product">
<!--商品信息:一个订单明细对应一个商品-->
<result column="prod_name" property="prodName"/>
<result column="prod_desc" property="prodDesc"/>
</association>
</collection>
</collection>
</resultMap>
接着,还有Mapper接口:1
2
3
4
5
6
7
8public interface OrderMapper {
//查找订单的顾客信息
List<Order> queryOrderCustomerInfo();
//查找订单的顾客所下商品的信息(编号,数量,价格)
List<Order> queryOrderCustomerProductInfo();
//查找顾客订单商品的详细信息
List<Customer> queryCustomerAndProductInfo();
}
下面是Service实现类的方法:1
2
3
4
5
6
7
8
9
10
11
12
13
14
15
16
17
18
19
20
21
22
23public class OrderServiceImpl implements OrderService {
SqlSessionFactory sqlSessionFactory = SqlSessionFactoryUtil.getSqlSessionFactory();
public List<Customer> queryCustomerAndProductInfo() {
SqlSession sqlSession = null;
try {
sqlSession = sqlSessionFactory.openSession();
OrderMapper mapper = sqlSession.getMapper(OrderMapper.class);
List<Customer> customerList = mapper.queryCustomerAndProductInfo();
sqlSession.commit();
return customerList;
} catch (Exception e) {
e.printStackTrace();
sqlSession.rollback();
} finally {
sqlSession.close();
}
return null;
}
}
测试类:1
2
3
4
5
6
7
8
public void testQueryCustomerAndProductInfo() {
OrderServiceImpl orderService = new OrderServiceImpl();
List<Customer> customerList = orderService.queryCustomerAndProductInfo();
for (Customer c : customerList) {
System.out.println(c);
}
}
测试结果:

至此,一对一,一对多,多对多关系就搞定啦。
4)性能分析和 N+1 问题
级联的优势是能够方便快捷地获取数据。比如顾客和顾客所下的订单商品信息往往是最常用关联的信息,这个时候级联是完全有必要的。多层关联时尽量少用级联,此时用处不大且会提高复杂度的增加,不利于他人理解和维护。
同时级联时也存在一些劣势,有时我们并不需要获取所有的数据。例如,我是某宝商家,双 11 当天 0 点的时候我只对顾客所下的订单数量和总价感兴趣,对订单商品的详细信息不感兴趣,我就不用去查商品表的信息了,这时候查询不但没有意义,而且会多执行几条 SQL,导致性能下降,只有当需要发货的时候,我才需要去查询商品信息,决定给买家发什么货。
5)延迟加载
什么是延迟加载?
为了处理 N+1 的问题,Mybatis 引入了延迟加载的功能:一开始并不取出级联数据,只有当它被使用了才发送 SQL 去取出数据,这样可以提高性能。
在 Mybatis 的主配置中有 2 个和延迟加载功能相关的全局参数,使用settings元素来配置:1
2
3
4
5
6
7
8
9
10
11
12
13
14<settings>
<!--lazyLoadingEnabled:是否开启全局延迟加载功能
默认值为false,即启动时不开延迟加载而立即加载。
注意:要使其生效,aggressiveLazyLoading需要设置为false
-->
<setting name="lazyLoadingEnabled" value="true"/>
<!--aggressiveLazyLoading:默认值为true,
代表对任意延迟属性的调用都会使带有延迟加载属性的对象立即完成加载,
为false时每种属性将按需延迟加载
将积极加载true改为消极加载false,即按需延迟才加载-->
<setting name="aggressiveLazyLoading" value="false"/>
</settings>
注意哦:若关联数据较多,则将造成不少的性能问题,此时可以开启该功能。
快速入门 demo
下面通过一个查询顾客信息的demo来认识一下延迟加载。
CustomerMapper接口:1
2
3
4public interface CustomerMapper {
//能根据 Id 查询顾客信息
Customer queryCustomerById(int id);
}
对应的CustomerMapper.xml文件:1
2
3
4
5
6
7
8
9
<mapper namespace="cn.wk.mapper.CustomerMapper">
<select id="queryCustomerById" resultType="Customer">
SELECT * FROM customers WHERE cust_id = #{id}
</select>
</mapper>
上面的接口和 XML 下面会使用到。
OrderMapper接口:1
2
3
4public interface OrderMapper {
//延迟加载订单的顾客信息
List<Order> queryOrderCustomerLazyLoading();
}
对应 XML 文件中的select语句和其resultMap映射:
1 | <resultMap id="OrderCustomerLazyLoadingResultMap" type="Order"> |
在此 XML 文件中,我们将前面写过的Customer映射器传递进来使用,相当于拼接了一个新的 SQL 语句。
CustomerService实现类:1
2
3
4
5
6
7
8
9
10
11
12
13
14
15
16
17
18
19
20
21
22public class CustomerServiceImpl implements CustomerService {
SqlSessionFactory sqlSessionFactory = SqlSessionFactoryUtil.getSqlSessionFactory();
public Customer queryCustomerById(int id) {
SqlSession sqlSession = null;
try {
sqlSession = sqlSessionFactory.openSession();
CustomerMapper mapper = sqlSession.getMapper(CustomerMapper.class);
Customer customer = mapper.queryCustomerById(id);
sqlSession.commit();
return customer;
} catch (Exception e) {
e.printStackTrace();
sqlSession.rollback();
} finally {
sqlSession.close();
}
return null;
}
}
OrderService实现类1
2
3
4
5
6
7
8
9
10
11
12
13
14
15
16
17
18
19
20
21
22
23public class OrderServiceImpl implements OrderService {
SqlSessionFactory sqlSessionFactory = SqlSessionFactoryUtil.getSqlSessionFactory();
public List<Order> queryOrderCustomerLazyLoading() {
SqlSession sqlSession = null;
try {
sqlSession = sqlSessionFactory.openSession();
OrderMapper mapper = sqlSession.getMapper(OrderMapper.class);
List<Order> orderList = mapper.queryOrderCustomerLazyLoading();
sqlSession.commit();
return orderList;
} catch (Exception e) {
e.printStackTrace();
sqlSession.rollback();
} finally {
sqlSession.close();
}
return null;
}
}
测试类:1
2
3
4
5
6
7
8
9
10
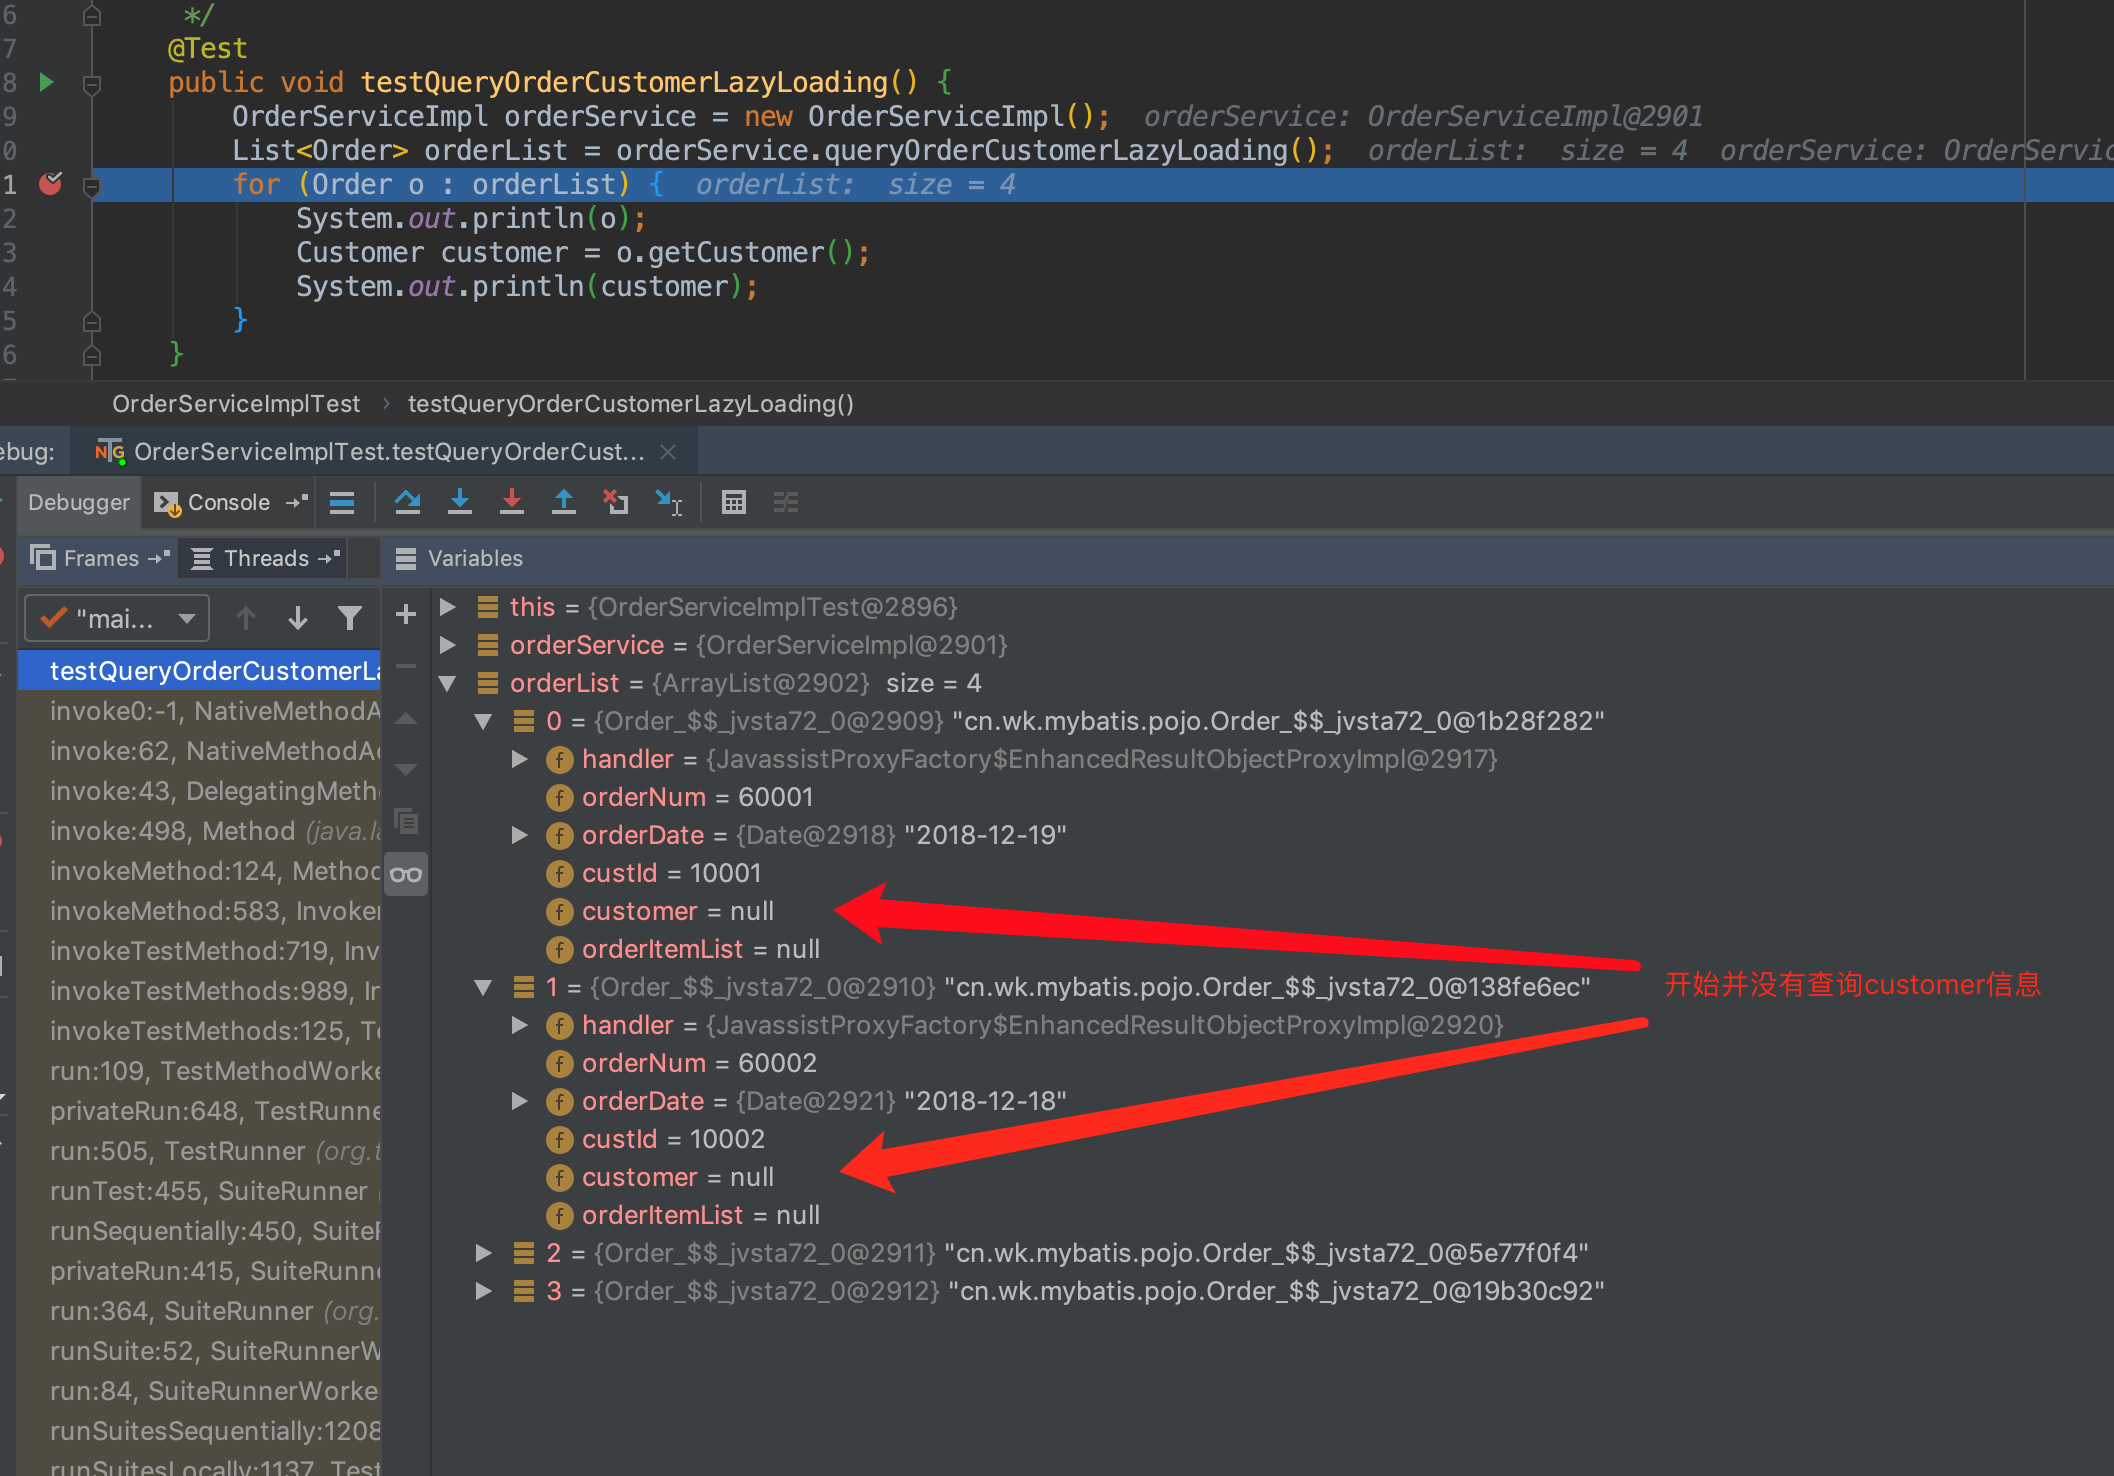
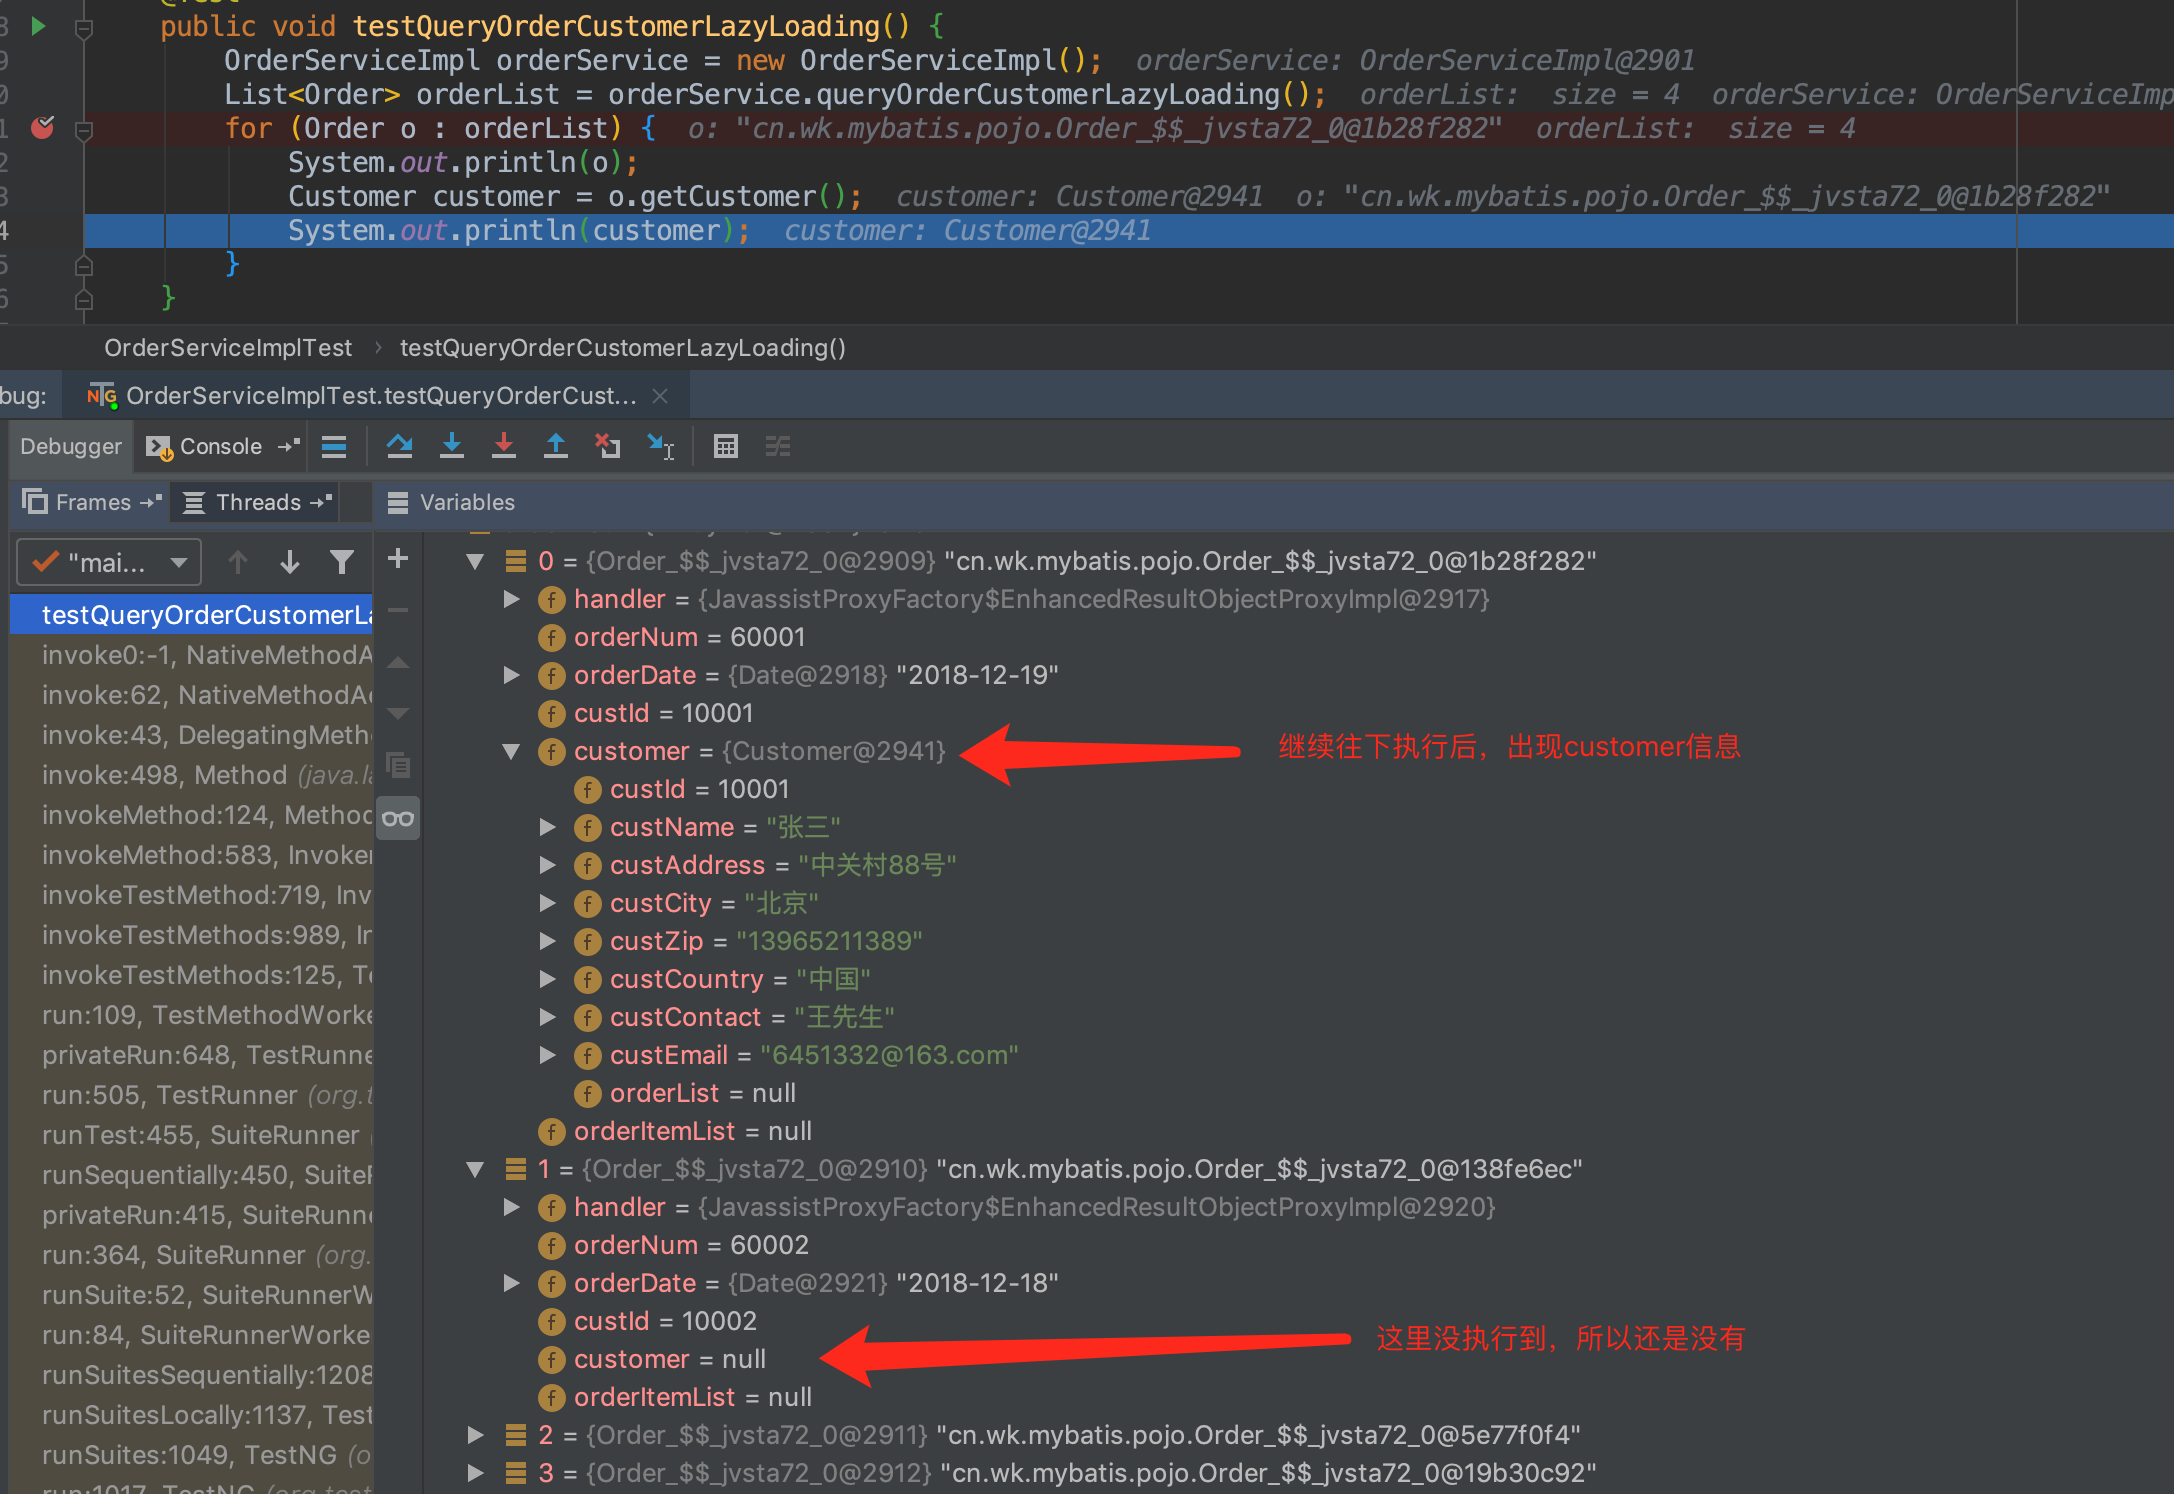
public void testQueryOrderCustomerLazyLoading() {
OrderServiceImpl orderService = new OrderServiceImpl();
List<Order> orderList = orderService.queryOrderCustomerLazyLoading();
for (Order o : orderList) {
System.out.println(o);
Customer customer = o.getCustomer();
System.out.println(customer);
}
}
测试结果:
当然,上面的是全局的配置,但是还是不太灵活的,为什么呢?因为我们不能指定到哪些属性可以立即加载,哪些属性可以延迟加载,有时候我想用延迟加载,有时候我又不想用延迟加载。Mybatis 提供局部加载的功能,我们可以在association元素上使用一个参数fetchType:

fetchType有两个参数:
lazy:默认参数,代表懒加载eager:开启后生效,代表立即加载
缓存
缓存在互联网中常常用到,其特点是将数据保存在内存中。目前流行的缓存服务器有MongoDB、Redis等。
缓存是在计算机内存上保存的数据,在读取的时候无需再从磁盘读入,因此具备快速读取和使用的特点。
若缓存命中率高,那么可以极大地提高系统的性能。
若缓存命中率很低,那么缓存就不存在使用的意义了,所以使用缓存的关键在于存储内容访问的命中率。

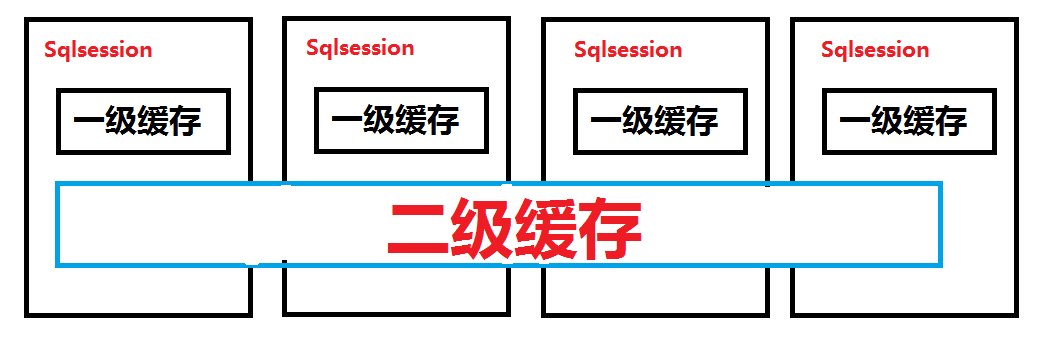
Mybatis 的缓存存在两种:
- 一级缓存:指在同一个 SqlSession 中,对于相同的查询语句,第一次执行查询后,将结果缓存起来。当再次执行相同的查询语句时,直接从缓存中获取结果,而不再去查询数据库。一级缓存的作用域是 SqlSession,因此它的生命周期是与 SqlSession 相关联的。一级缓存在同一个 SqlSession 中是有效的,当 SqlSession 关闭后,缓存也会被清空。
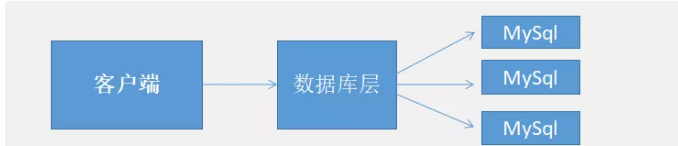
- 二级缓存:指将查询结果缓存到一个可共享的缓存区域中,可以被多个 SqlSession 共享。当多个 SqlSession 执行相同的查询语句时,可以直接从二级缓存中获取结果,而不需要再次查询数据库。二级缓存的作用域是 Mapper(namespace)级别的,因此多个 SqlSession 可以共享同一个 Mapper 的二级缓存。需要在 MyBatis 的配置文件中进行相应的配置,启用二级缓存。
默认情况下只开启一级缓存,而二级缓存是mapper级别的缓存,它是所共享的,缓存区别如下图:
一级缓存
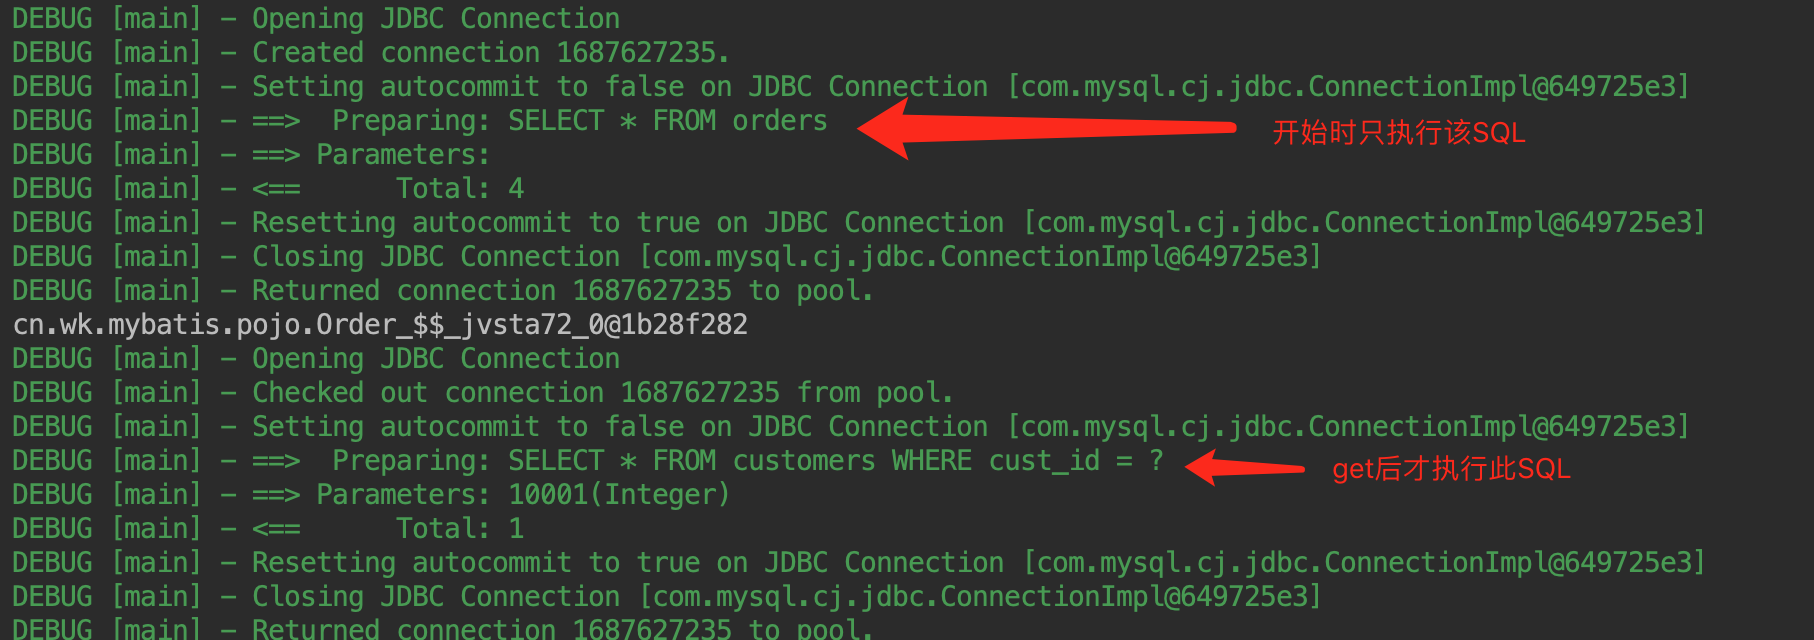
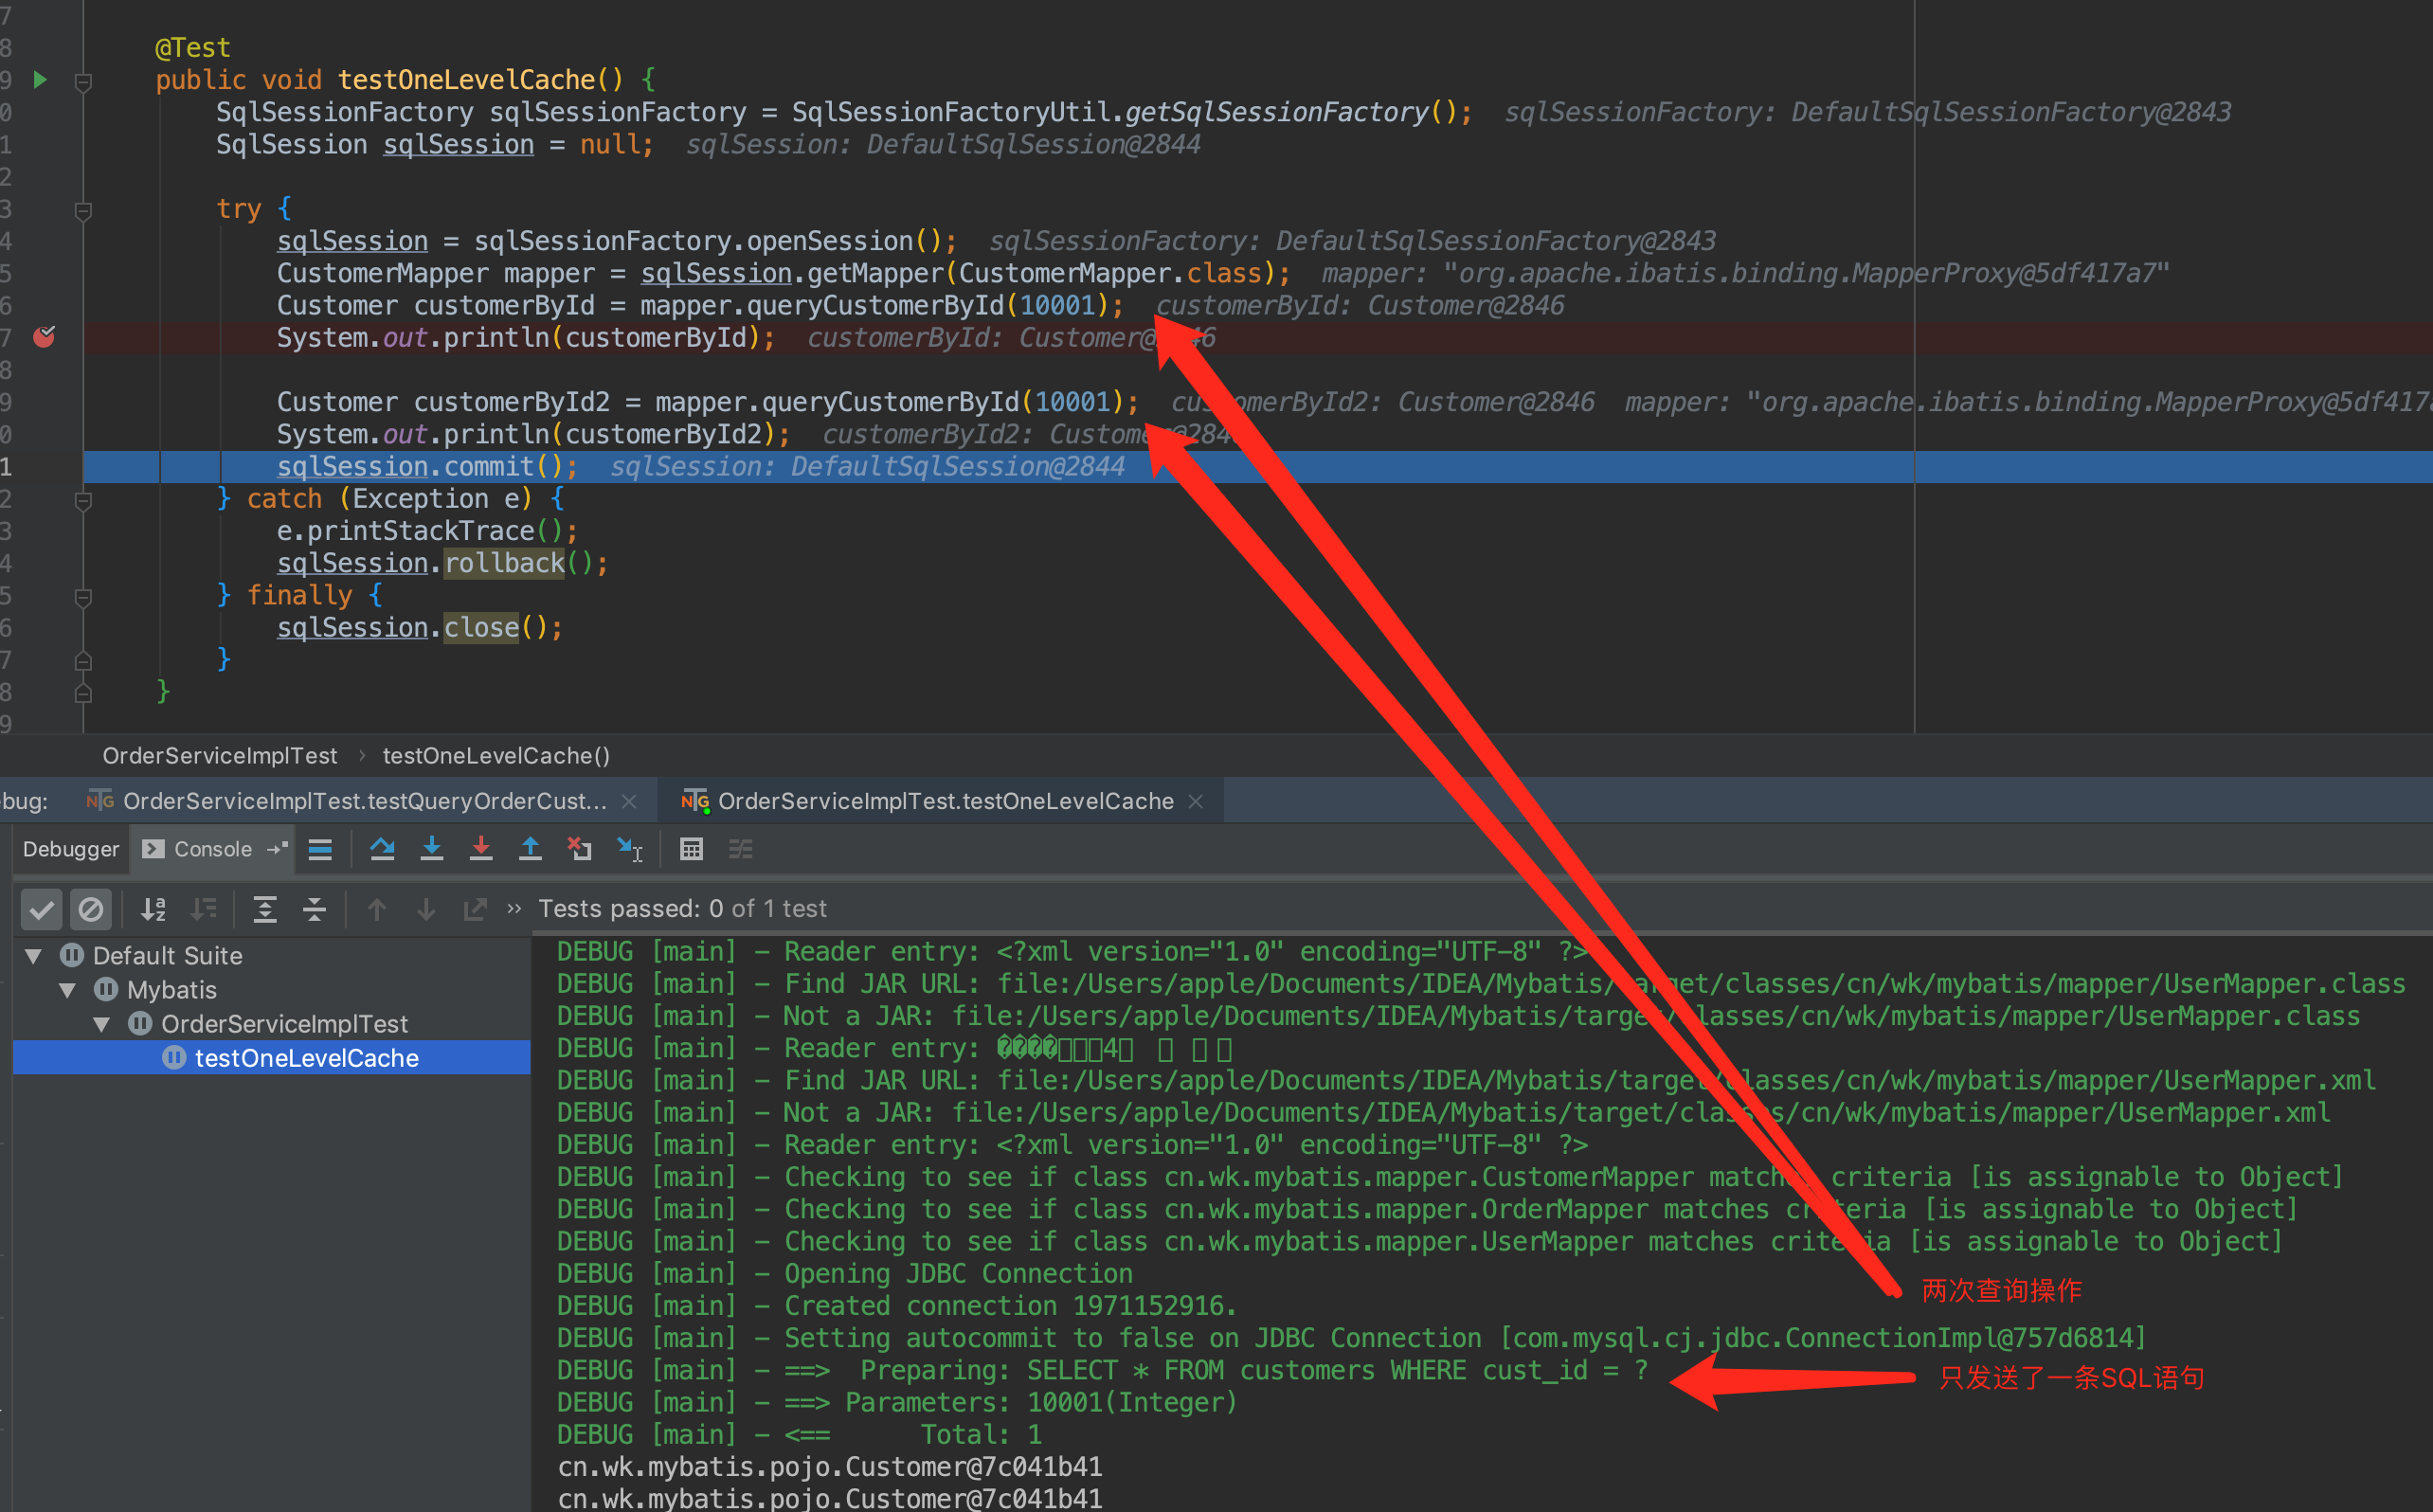
因为一级缓存,在参数和 SQL 完全一样的情况下,使用同一个SqlSession对象调用同一个Mapper的方法时往往只会执行一次SQL,因为使用SqlSession第一次查询后,Mybatis会(通过HashMap格式保存的方式)把其放在缓存中,在以后的查询中,若缓存没有刷新(执行 insert、update、delete 操作会清空缓存)或未超时的情况下,Sqlsession都只会取出当前缓存的数据,而不会再次发送 SQL 到数据库。
不修改的多次查询
如下面的例子:
修改的多次查询
我们再来个例子,执行insert,update,delete操作会清空缓存,此时又发送了 SQL 查询:
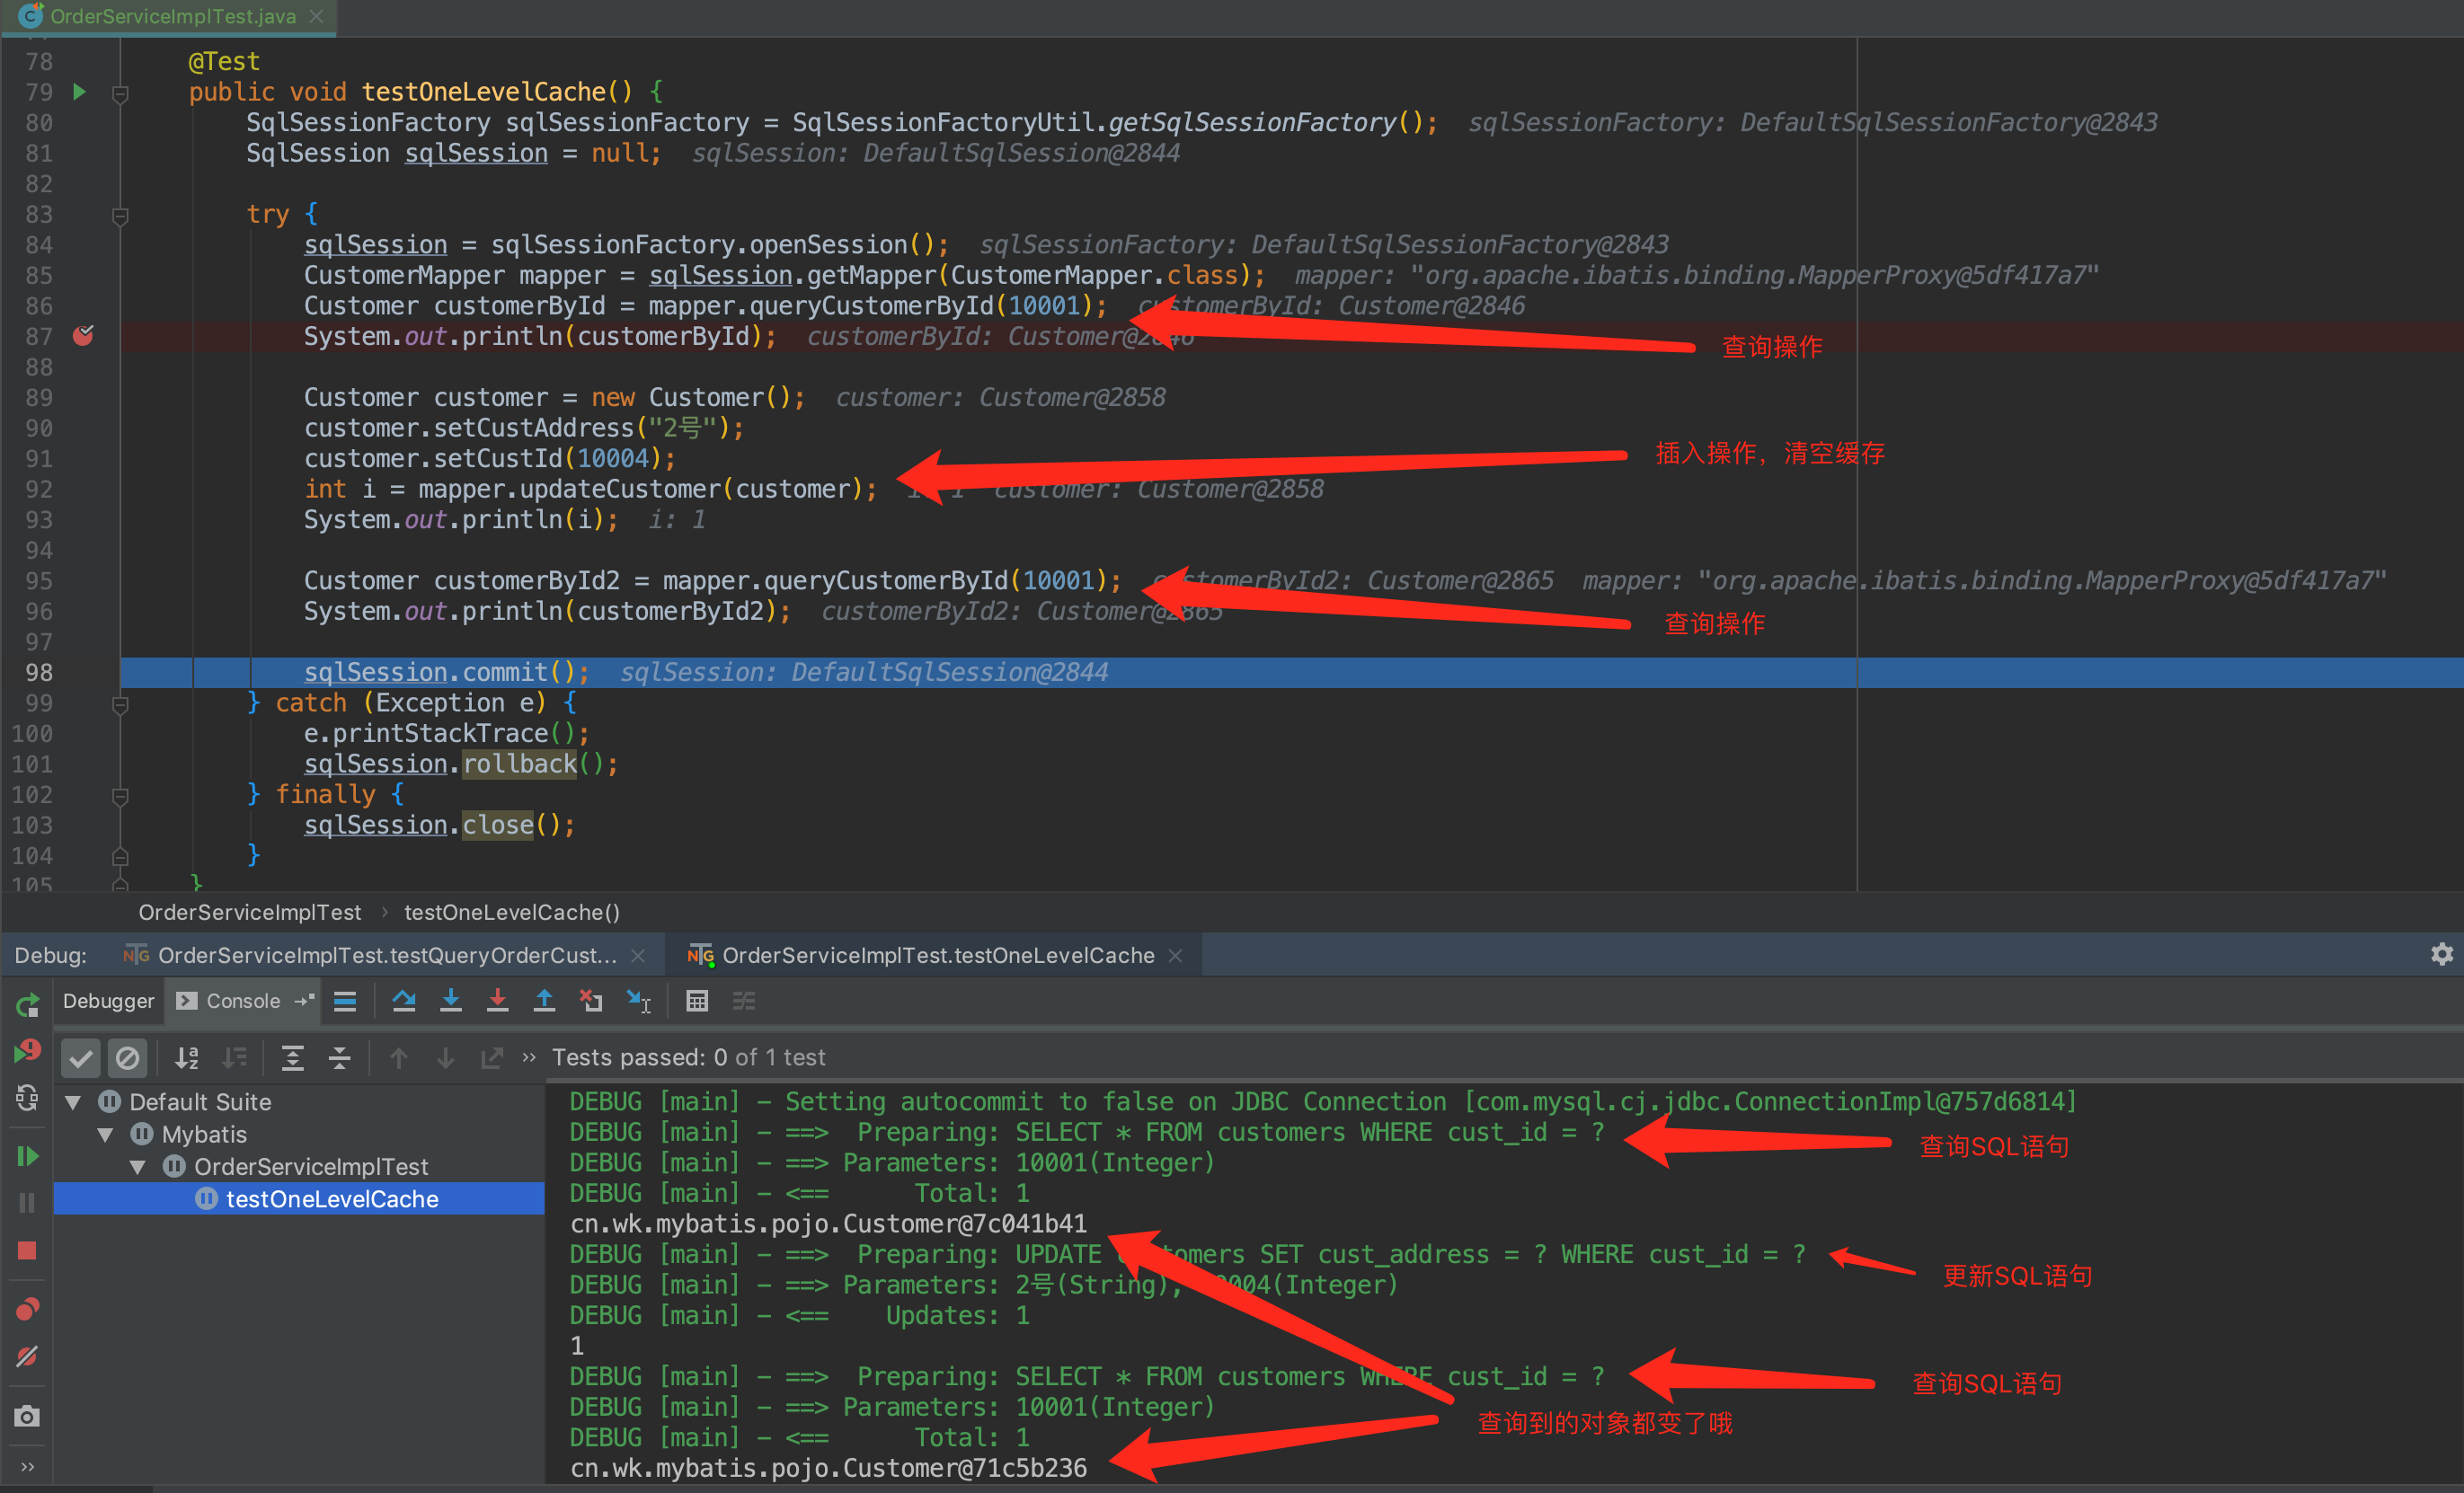
一级缓存只对同一SqlSession才有用,若想对多个SqlSession生效,需要使用二级缓存。
二级缓存
若想使用二级缓存,其需要手动在映射 XML 文件配置来开启实现二级缓存,并且 Mybatis 使用二级缓存时,要求返回的 POJO 对象必须是可序列化的,也就是说要实现Serializable接口。
下面,我们来写一个二级缓存的例子:
首先,需要将POJO对象Customer序列化:1
2//部分代码省略
public class Customer implements Serializable {...}
其次,在CustomerMapper.xml文件开启二级缓存:1
2
3
4
5
6
7
8
9
10
<mapper namespace="cn.wk.mybatis.mapper.CustomerMapper">
<!--开启二级缓存-->
<cache/>
<!--其他代码省略-->
</mapper>
测试结果:

开启二级缓存只需要使用<cache/>元素,很多配置都是默认的,这意味着:
- 映射语句文件中的所有
select语句将会被缓存 - 映射语句文件中的所有
insert、update和delete语句会刷新缓存(清空缓存) - 缓存会使用默认的
Least Recently Used(LRU,最近最少使用的)算法来回收 - 根据时间表,比如
No Flush Interval,(CNF1,没有刷新间隔),缓存不会以任何时间顺序来刷新 - 缓存会存储列表集合或对象(无论查询方法返回什么)的
1024个引用 - 缓存会被视为是
read/write(可读/可写)的缓存,意味着对象检索不是共享的,而且可以安全地被调用者修改,不干扰其他调用者或线程所做的潜在修改
定制缓存
系统缓存是 Mybatis 应用机器上的本地缓存,但是在大型服务器上,会使用各类不同的缓存服务器,此时可以定制缓存,如现在十分流行的 Redis 缓存服务器,它的功能比 Mybatis 的缓存功能更强大。
若要定制缓存,需要实现 Mybatis 为我们提供的接口org.apache.ibatis.cache.Cache,缓存接口简介代码如下:
1 | // 获取缓存编号 |
因为每种缓存都有不同的特点,上面的接口可以根据不同的缓存来自定义配置1
<cache type=""/>
扩展——缓存过期时间
在 MyBatis 中,默认情况下,缓存是不设置过期时间的,也就是缓存数据永不过期。这意味着一旦数据被缓存,除非手动清除缓存或执行相应的更新操作,否则缓存中的数据将一直存在。
如果你希望设置缓存的过期时间,可以在 MyBatis 的配置文件中进行相应的配置。具体的配置方式是通过 <cache /> 标签的 eviction 属性来指定缓存的过期策略。
下面是一个示例,展示如何在 MyBatis 配置文件中设置缓存的过期时间为 30 分钟:
1 | <configuration> |
在上述示例中,通过 eviction 属性指定了缓存的过期策略为 LRU(Least Recently Used,最近最少使用)。flushInterval 属性指定了缓存刷新的间隔时间,单位为毫秒,这里设置为 1800000 毫秒,即 30 分钟。其他的属性如 size 和 readOnly 可根据需要进行配置。
动态 SQL
若使用 JDBC 或其他框架(如 Hibernate),很多时候需要根据要求来拼装 SQL,这是一个麻烦的事情。
而在 Mybatis 中,其提供了对 SQL 语句动态组装的能力,使用几个基本元素即可实现上述功能,将大量的判断直接在 XML 映射文件中配置,达到了许多需要大量代码才能实现的功能,不仅提高了开发效率,还易于后期维护。
Mybatis 的动态 SQL 包括以下几种元素:
| 元素 | 作用 | 备注 |
|---|---|---|
| if(常用) | 判断语句 | 单条件分支判断 |
| choose(when、otherwise) | 相当于 Java中 case when | 多条件分支判断 |
| trim(where、set) | 辅助元素 | 用于处理一些 SQL 拼接问题 |
| foreach | 循环语句 | 在in语句等列举条件常用 |
① if 元素
if元素是最常用的判断语句,其相当于Java的if语句,它常常与test属性联合使用。
比如有个用户的帐号被盗了,该用户申请找回,提供帐号相关信息后,程序员就要根据用户提供的信息来查找该用户帐号的全部信息,但有时候我们先查看的是数据库中所有用户的信息,这时name就是一个可填可不填的条件,不填写的时候就不要用它作为查询条件。
1 | <select id="queryUserByName" resultType="User"> |
注意哦:传递一个String参数的时候请将 SQL 的参数写为_parameter。
1 | <select id="queryUserByName" parameterType="string" resultType="User"> |

if 中的 test 属性
test的属性用于在条件判断if语句中判断真假。
一般用该属性来判空和判断空串,但有时也用来判断数字和枚举等。
② choose(when、otherwise)元素
有时候,我们不想使用所有的条件,而只是想从多个条件中选择一个使用。
针对这种情况,MyBatis 提供了choose元素,它有点像 Java 中的switch语句。
先看看下面的示例吧:1
2
3
4
5
6
7
8
9
10
11
12
13
14
15<select id="findActiveBlogLike"
resultType="Blog">
SELECT * FROM blog WHERE state = ‘ACTIVE’
<choose>
<when test="title != null">
AND title like #{title}
</when>
<when test="author != null and author.name != null">
AND author_name like #{author.name}
</when>
<otherwise>
AND hot = 1
</otherwise>
</choose>
</select>
对以上动态 SQL 而言:
- 传入了
title就按title查找 - 传入了
author就按author查找 - 若两者都没有传入,就返回标记为
hot的blog(这可能是管理员认为,与其返回大量的无意义随机 Blog,还不如返回一些由管理员挑选的热门blog)
③ where、trim、set 元素
where 元素
我们在上面使用 if 元素的时候加入了 1 个条件1=1,若没有加入这个条件,那么就可能变成一条错误的语句,而加入了1=1这样的条件又显得相当奇怪。
在 Mybatis 中,where 元素只会在至少有一个子元素的条件返回 SQL 子句的情况下才去插入WHERE子句。而且,若语句的开头为AND或OR,where 元素也会将它们去除。
因此,使用where元素去处理 SQL 也可以达到预期的效果:
1 | <select id="queryUserByName" resultType="User"> |
trim 元素
有时候我们要去掉一些特殊的 SQL 语法,比如常见的and、or,而使用trim元素就可以达到我们预期的效果:
1 | <select id="queryUserByName" parameterType="string" resultType="User"> |
上面的写法基本与where是等效的。trim元素意味这我们需要去掉一些特殊的字符串,prefix代表的是语句的前缀,而prefixOverrides代表的是你需要去掉的那种字符串。
set 元素
在 Hibernate 中我们常常需要更新某一对象,发送所有的字段给持久对象。
但现实中的场景往往是:我只想更新一个字段。
若发送所有的属性去更新的话,对网络带宽消耗较大,性能最佳的办法是把主键和更新字段的值传递给 SQL 更新即可。
例如,数据表中有一个主键和两个字段,若一个个去更新,则需要写 2 条 SQL,若有 1000 个字段呢,都去更新吗?
显而易见,这样做是不方便的。
在 Hibernate 中,我们做更新都是使用全部字段发送给 SQL 的方法来避免这一情况发生。
而在 Mybatis 中,则可以使用set元素来完成这些功能:
1 | <update id="updateUser" parameterType="User"> |
set元素会动态地在行首插入 SET 关键字,并会删掉额外的逗号(这些逗号是在使用条件语句给列赋值时引入的)
注意哦:动态 SQL 会帮你去除逗号,但是若你忘记了逗号,他可不会帮你加上哦!
④ foreach 元素
foreach 元素是一个循环语句,它的作用就是遍历集合,如果传入的是一个 数组、 List、Set、Map 接口的集合,就可以使用它了。
当使用的是单列集合或数组时,index 是当前迭代的序号,item 的值是本次迭代获取到的元素。(常用)
当使用 Map 对象(或 Map.Entry 对象的集合)时,index 是键,item 是值。
快速入门
1 | <select id="getUserByIdList" resultType="User"> |
在上述示例中,我们假设有一个 User 类对象的集合idList,我们想要根据这个集合中的 ID 值查询对应的用户信息,其中:
collection:指定要遍历的集合或数组的属性名,即 idListitem:指定在遍历过程中的每个元素的临时变量名,即 id。在每次循环迭代时,将当前元素赋值给该变量open:指定整个遍历结果的开头部分,即左括号(close:指定整个遍历结果的结束部分,即右括号)separator:指定每个元素之间的分隔符,即逗号,
<foreach>标签将会将集合 idList 中的元素逐个拼接到 SQL 语句的IN语句中,生成类似于id IN (1, 2, 3)的查询条件。<foreach>标签中的item变量可以在标签内部的 SQL 语句中使用,通过#{}语法访问。在示例中,我们通过#{id}获取了每个元素的值。
类型差异
数组
1 | Long[] deleteUserList = new Long[]{1L,2L,3L}; |
1 | <delete id="deleteUserByIds" parameterType="Long"> |
List 集合
假如有以下查询:1
SELECT * FROM product WHERE prod_id IN ("GTX01", "GTX02", "GTX03");
那么在 Java 中进行查询的时候,我们可以把三个参数封装到一个 List 中,然后用foreach语句遍历取出:
1 | <select id="findProductListByProdId" parameterType="java.util.List" |
使用时的相关操作:
1 |
|
参考
- Mybatis 官方文档
- 杨开振. 深入浅出 MyBatis 技术原理与实战 [M]. 电子工业出版社,2016
文章信息
| 时间 | 说明 |
|---|---|
| 2018-12-22 | 初版 |
| 2021-08-14 | 文章重构 |